Terraform - Complete step-by-step process to create a (VM) on Azure and SSH under student pack subscription.
Making a Linux virtual machine on Microsoft Azure using Terraform. From setting up providers and creating a resource group to configuring networking components and managing SSH authentication using azure CLI & GUI
step-by-step guide to generate the required values for using Terraform with Microsoft Azure:
✅ Install Required Tools
You’ll need to install the following tools on your local machine:
1. Terraform
- Go to: https://developer.hashicorp.com/terraform/downloads
- Download and install Terraform for your operating system.
After installation, verify with:
1
terraform -v
2. Azure CLI
- Go to: https://learn.microsoft.com/en-us/cli/azure/install-azure-cli
- Install the Azure CLI for your OS.
After installation, check it:
1
az version
✅ Log in to Azure
Login to your Azure account using Azure CLI:
1
az login
A browser window will open asking you to log in with your student pack credentials.
You can list your subscription:
1
az account show
⚙️ Get the azure_subscription_id and azure_tenant_id
Run this command:
1
az account show --query "{subscriptionId:id, tenantId:tenantId}"
Output:
1
2
3
4
{
  "subscriptionId": "xxxxxxxx-xxxx-xxxx-xxxx-xxxxxxxxxxxx",
  "tenantId": "yyyyyyyy-yyyy-yyyy-yyyy-yyyyyyyyyyyy"
}
✅ Copy the values for:
azure_subscription_idazure_tenant_id
Get Azure Subscription ID via GUI
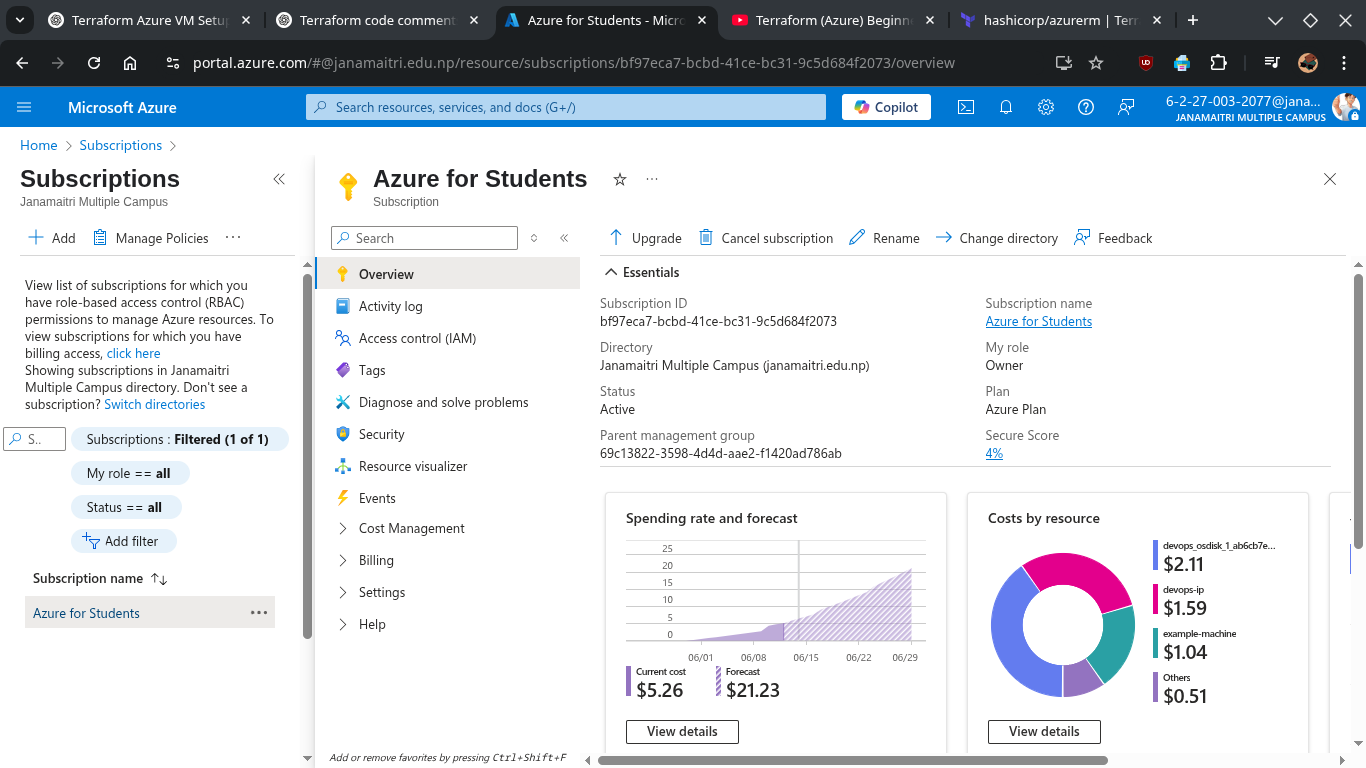
Go to Azure Portal 👉 Visit: https://portal.azure.com Log in with your Azure account.
Open ‘Subscriptions’ Panel
- Click on the search bar at the top.
- Type “Subscriptions” and click on the result.
View Subscription Details
- You’ll see a list of your subscriptions.
- Each subscription will show the Subscription name and the Subscription ID.
Copy the Subscription ID
- Click on the subscription name to open its details.
- The Subscription ID will be visible in the overview pane.
- Click the copy icon 📋 next to it to copy.
🛠️ Create a Service Principal (SP) / App registrations
This SP will be used by Terraform to authenticate.
1
az ad sp create-for-rbac --name terraform-janak --role="Contributor" --scopes="/subscriptions/<subscription-id>"
Replace <subscription-id> with the actual value
Output:
1
2
3
4
5
6
{
  "appId": "zzzzzzzz-zzzz-zzzz-zzzz-zzzzzzzzzzzz",
  "displayName": "terraform-sp",
  "password": "********-****-****-****-************",
  "tenant": "yyyyyyyy-yyyy-yyyy-yyyy-yyyyyyyyyyyy"
}
✅ Save:
azure_client_id = appIdazure_client_secret = passwordazure_tenant_id = tenant(same as before)
GUI Methods: Step-by-step guide to get your Azure Client ID, Client Secret, and Tenant ID from the Azure Portal (GUI) using App Registrations:
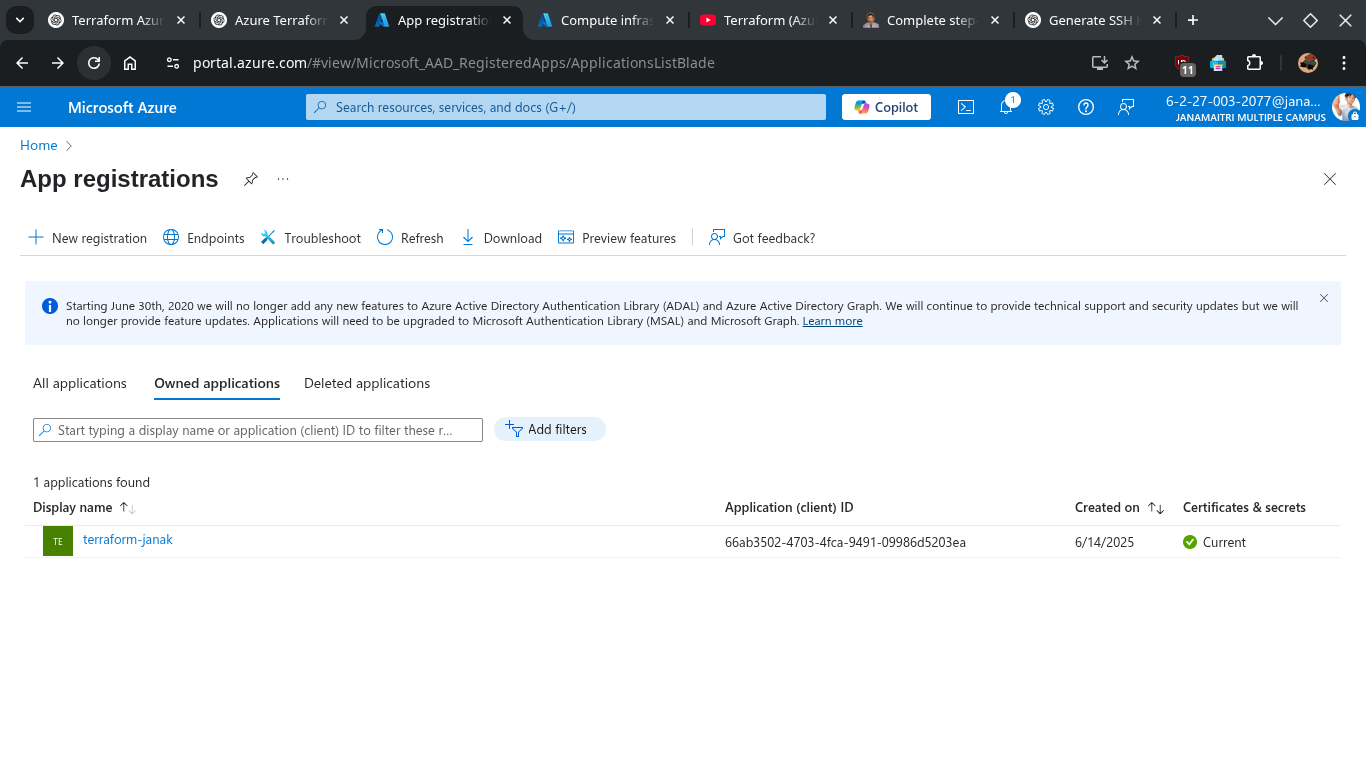
Step 1: Go to App Registrations
- Click on the Search bar at the top.
- Type “App registrations” and select it.
- Click “+ New registration”.
Step 2: Register the Application
- Name your app (e.g.,
terraform-janak). - Leave the default Supported account types as Single tenant (or your choice).
- Redirect URI: leave empty
- Click “Register”.
🔹 Step 3: Get the IDs

✅ Client ID (azure_client_id)
- Go to the Overview tab.
- Copy the value labeled “Application (client) ID”.
✅ Tenant ID (azure_tenant_id)
- In the same Overview tab.
- Copy the value labeled “Directory (tenant) ID”.
🔹 Step 4: Create a Client Secret
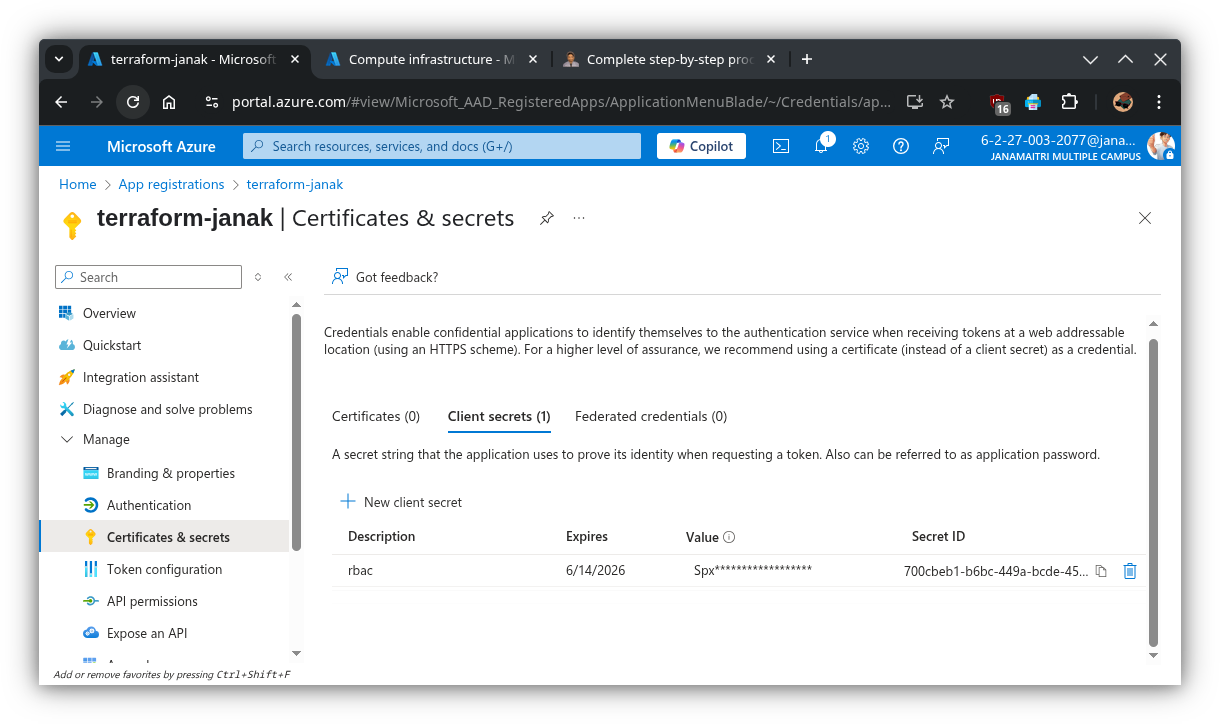
- In the left menu, click “Certificates & secrets”.
- Under Client secrets, click “+ New client secret”.
- Add a description (e.g.,
anything), choose an expiration (e.g., 6 or 12 months). - Click “Add”.
- Copy the value immediately shown under “Value” – this is your
azure_client_secret. ⚠️ You won’t be able to view it again once you leave the page.
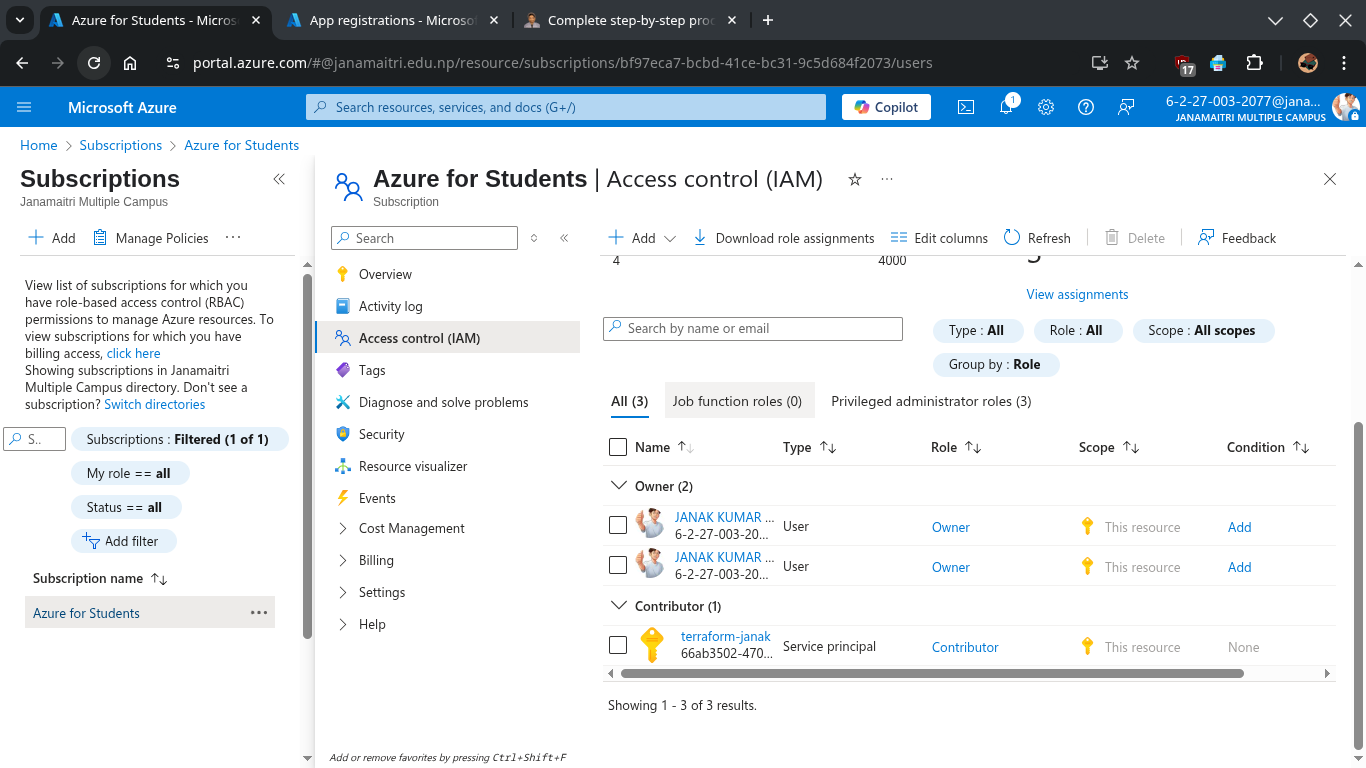
👮 Confirm Role Assignment
You can check if the role was properly assigned:
1
az role assignment list --assignee <appId>
Assign Contributor role:
1
2
3
4
5
az role assignment create \
  --assignee <app-id> \
  --role "Contributor" \
  --scope /subscriptions/<subscription-id>
GUI Methods: Assign Permissions to the App
To give your app permissions to deploy resources:
- Go to Subscriptions → Select your subscription.
- Click “Access control (IAM)”.
- Click “+ Add” > “Add role assignment”.
- Under the Privileged administrator roles choose: Contributor
- Assign access to: User, group, or service principal
- Select Members: search for your app name (
Terraform-janak) and select it.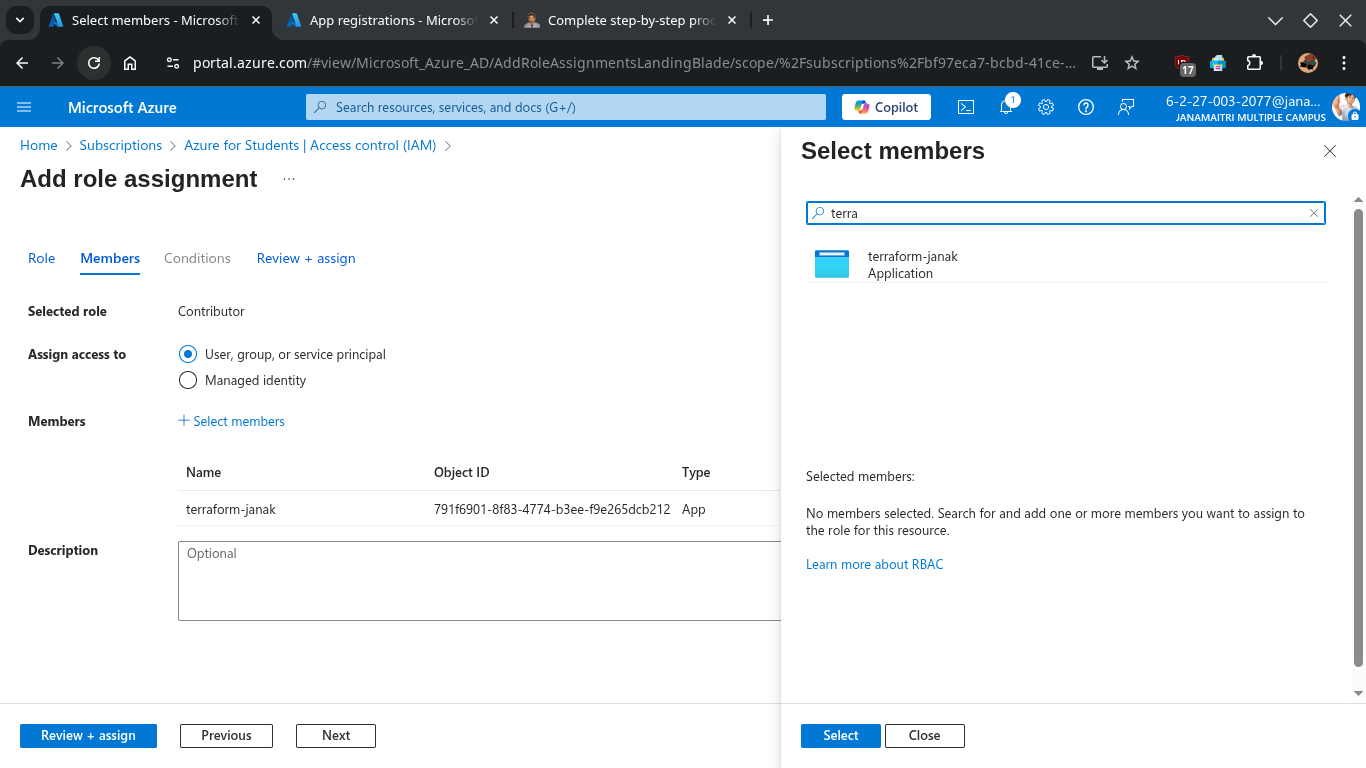
- Click Save.
📌 Summary of Values
You now have:
| Variable | Description |
|---|---|
azure_subscription_id | Your Azure subscription ID |
azure_client_id | appId |
azure_client_secret | password |
azure_tenant_id | Azure tenant ID |
✅ Generate SSH Key (If not)
1
ssh-keygen -t rsa -b 4096 -C "[email protected]"
✅ Configure Terraform Directory
Create a new project folder:
1
2
mkdir terraform-azure
cd terraform-azure
Create a file named
main.tf:1
nano main.tf
Paste the following into main.tf (you can edit names later):
1
2
3
4
5
6
7
8
9
10
11
12
13
14
15
16
17
18
19
20
21
22
23
24
25
26
27
28
29
30
31
32
33
34
35
36
37
38
39
40
41
42
43
44
45
46
47
48
49
50
51
52
53
54
55
56
57
58
59
60
61
62
63
64
65
66
67
68
69
70
71
72
73
74
75
76
77
78
79
80
81
82
83
84
85
86
87
88
89
90
91
92
93
94
95
96
97
98
99
100
101
102
103
104
105
106
107
108
109
110
111
112
113
114
115
116
117
118
119
120
121
122
123
124
125
126
127
128
129
130
131
132
133
134
135
136
137
138
139
140
141
142
143
144
145
# ------------------------------
# Specify the required provider
# ------------------------------
terraform {
  required_providers {
    azurerm = {
      source  = "hashicorp/azurerm"
      version = "~> 4.0" # Ensures you're using version 4.x of the Azure provider
    }
  }
}

# -----------------------------------------
# Configure the Azure provider credentials
# -----------------------------------------
provider "azurerm" {
  features {}

  # These variables will be passed via CLI, environment, or tfvars
  subscription_id = var.azure_subscription_id
  client_id       = var.azure_client_id
  client_secret   = var.azure_client_secret
  tenant_id       = var.azure_tenant_id
}

# -------------------------------
# Create a new Azure Resource Group
# -------------------------------
resource "azurerm_resource_group" "janak-azure" {
  name     = "Janak-res"  # Resource group name
  location = "westeurope"             # Azure region
}

# ---------------------------
# Create a Virtual Network
# ---------------------------
resource "azurerm_virtual_network" "janak-azure" {
  name                = "janak-azure-network"            # Name of the VNet
  address_space       = ["10.0.0.0/16"]              # CIDR block
  location            = azurerm_resource_group.janak-azure.location
  resource_group_name = azurerm_resource_group.janak-azure.name
}

# ----------------------
# Create a Subnet inside the VNet
# ----------------------
resource "azurerm_subnet" "janak-azure" {
  name                 = "internal"                                # Subnet name
  resource_group_name  = azurerm_resource_group.janak-azure.name
  virtual_network_name = azurerm_virtual_network.janak-azure.name
  address_prefixes     = ["10.0.2.0/24"]                          # Subnet IP range
}

# ----------------------------
# Create a Static Public IP Address
# ----------------------------
resource "azurerm_public_ip" "janak-azure" {
  name                = "janak-azure-public-ip"
  location            = azurerm_resource_group.janak-azure.location
  resource_group_name = azurerm_resource_group.janak-azure.name
  allocation_method   = "Static"       # IP will not change
  sku                 = "Standard"     # Standard SKU supports NSG and zones
  sku_tier            = "Regional"     # Tier of the SKU
}

# -------------------------------
# Create a Network Security Group (NSG)
# -------------------------------
resource "azurerm_network_security_group" "janak-azure" {
  name                = "janak-azure-nsg"
  location            = azurerm_resource_group.janak-azure.location
  resource_group_name = azurerm_resource_group.janak-azure.name

  # Allow inbound SSH (port 22) from anywhere
  security_rule {
    name                       = "Allow-SSH"
    priority                   = 1001
    direction                  = "Inbound"
    access                     = "Allow"
    protocol                   = "Tcp"
    source_port_range          = "*"
    destination_port_range     = "22"
    source_address_prefix      = "*"
    destination_address_prefix = "*"
  }
}

# -----------------------------------------------------
# Associate NSG with the network interface of the VM
# -----------------------------------------------------
resource "azurerm_network_interface_security_group_association" "janak-azure" {
  network_interface_id      = azurerm_network_interface.janak-azure.id
  network_security_group_id = azurerm_network_security_group.janak-azure.id
}

# ----------------------------
# Create a Network Interface
# ----------------------------
resource "azurerm_network_interface" "janak-azure" {
  name                = "janak-azure-nic"
  location            = azurerm_resource_group.janak-azure.location
  resource_group_name = azurerm_resource_group.janak-azure.name

  # IP configuration for the NIC
  ip_configuration {
    name                          = "internal"
    subnet_id                     = azurerm_subnet.janak-azure.id
    private_ip_address_allocation = "Dynamic"
    public_ip_address_id          = azurerm_public_ip.janak-azure.id
  }
}

# ----------------------------
# Create a Linux Virtual Machine
# ----------------------------
resource "azurerm_linux_virtual_machine" "janak-azure" {
  name                  = "Janak-azure-terraform"                        # Name of the VM
  resource_group_name   = azurerm_resource_group.janak-azure.name
  location              = azurerm_resource_group.janak-azure.location
  size                  = "Standard_B1s"                        # Free-tier eligible size
  admin_username        = "janak_azure"                          # SSH login username
  network_interface_ids = [azurerm_network_interface.janak-azure.id]

  # SSH Key-based authentication
  admin_ssh_key {
    username   = "janak_azure"
    public_key = file("~/.ssh/id_rsa.pub")                    # Path to public SSH key
  }

  disable_password_authentication = true                      # Force key-only login

  # OS Disk configuration
  os_disk {
    caching              = "ReadWrite"
    storage_account_type = "Standard_LRS"
  }

  # Use latest Ubuntu 22.04 LTS image
  source_image_reference {
    publisher = "Canonical"
    offer     = "0001-com-ubuntu-server-jammy"
    sku       = "22_04-lts"
    version   = "latest"
  }
}
- Create a file named
output.tf:
1
2
3
4
  output "public_ip" {
  description = "The public IP address of the virtual machine"
  value       = azurerm_public_ip.janak-azure.ip_address
  }
Create a file named
variables.tf:1 2 3 4 5 6 7 8 9 10 11 12
variable "azure_subscription_id" { type = string } variable "azure_client_id" { type = string } variable "azure_client_secret" { type = string } variable "azure_tenant_id" { type = string }
Create a file named
terraform.tfvarsand replace your own keys:1 2 3 4
azure_subscription_id = "bf97eca7-bcbd-41ce-bc31-9c5d6fds84f2073" #subscription id azure_client_id = "2c6e5db5-620e-4b07-8b9a-904sfs45f297d41" #app registration azure_tenant_id = "69c13822-3598-4d4d-aae2-f142dsfs0ad786ab" #tenant id azure_client_secret = "UbB8Q~3GxAWrF67k1LdsdfvUzk72b2DBV~rgTkAkOaad" #secret value
✅ Initialize and Apply Terraform
1. Initialize Terraform in your project directory:
1
terraform init
2. Preview the actions Terraform will take:
1
terraform plan
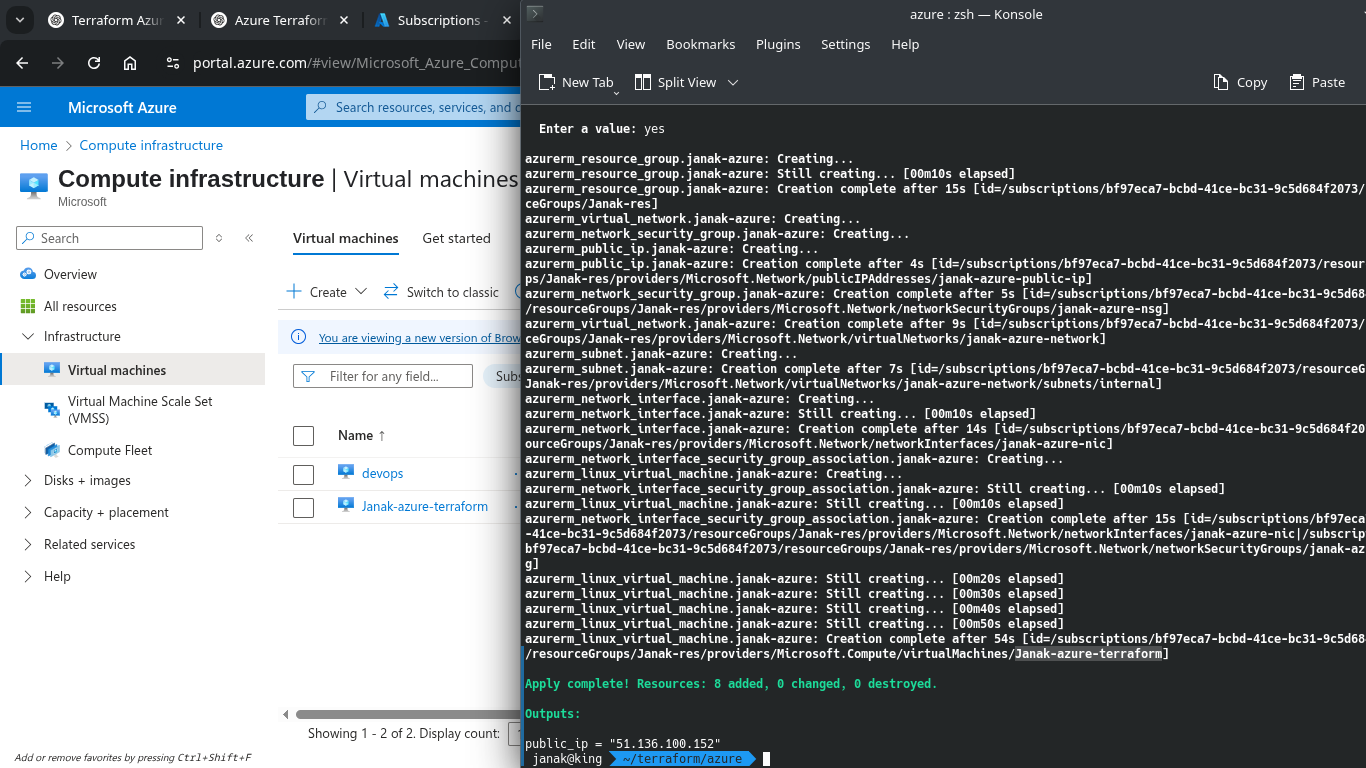
3. Apply the configuration:
1
terraform apply
Confirm when prompted by typing yes.
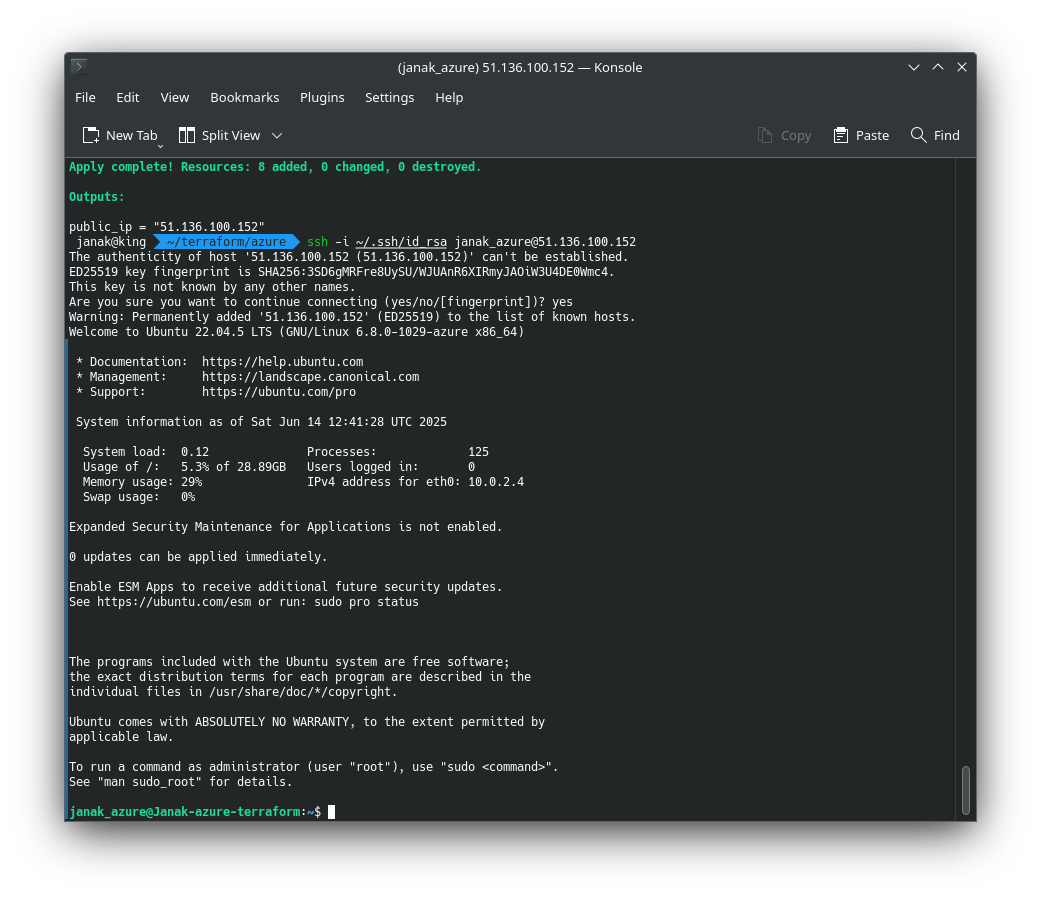
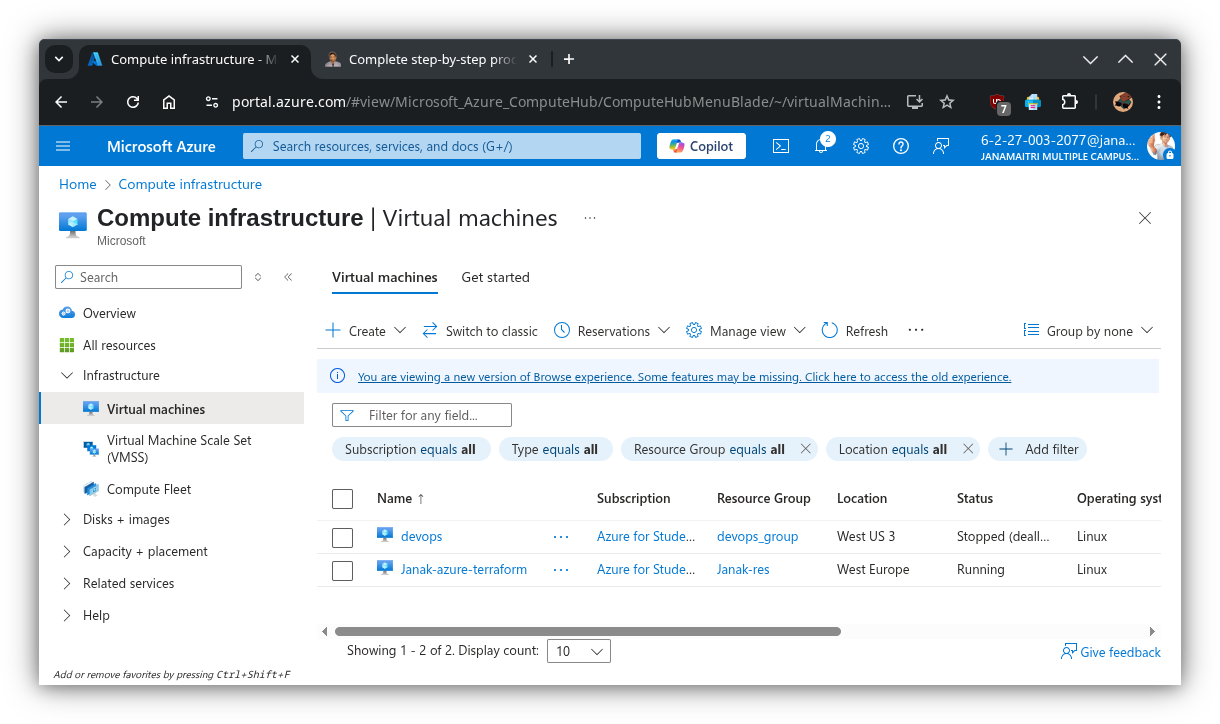
✅ SSH to newly created azure VM
1
ssh -i ~/.ssh/id_rsa [email protected]
Use your own your USERNAME & IP
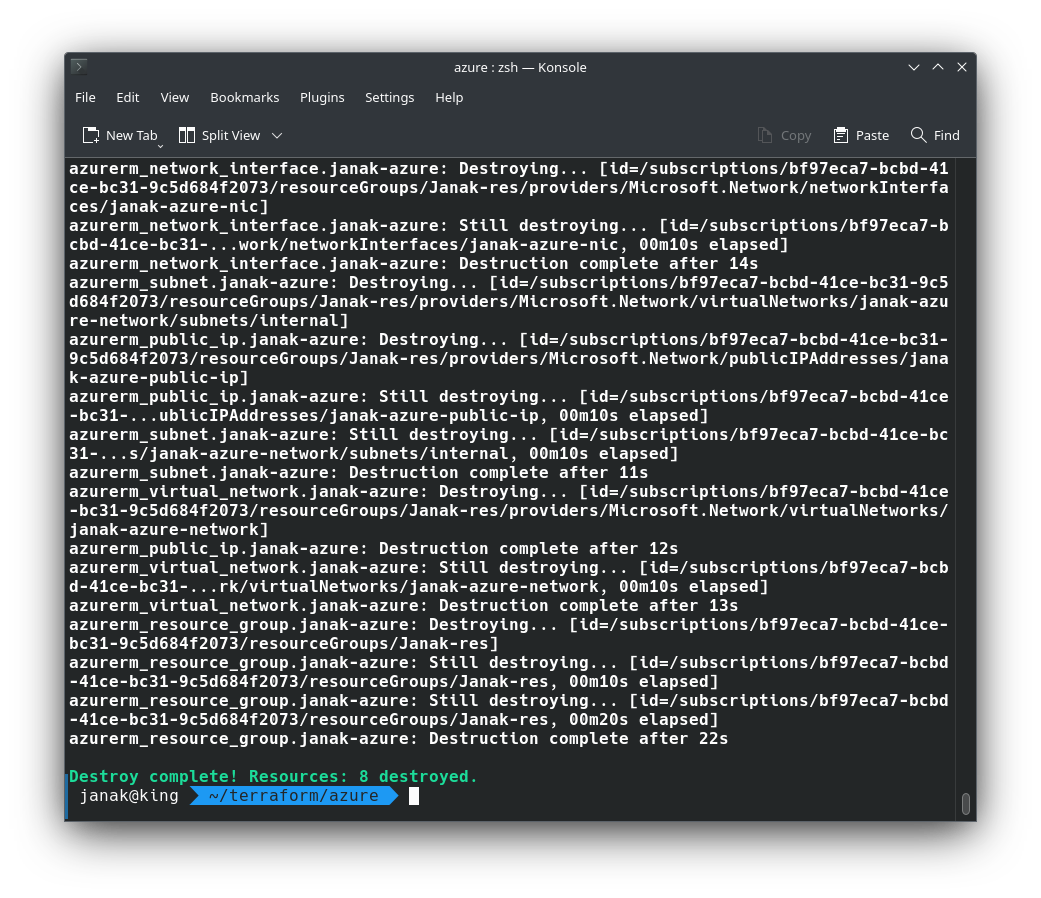
✅ Clean Up (To Save Free Credits)
When you’re done, destroy the resources:
1
terraform destroy
📚 References:
🎥 [Deploy Azure VM using Terraform YouTube Tutorial](https://www.youtube.com/watch?v=ZoB5cG_zakM) - 📘 Terraform Azurerm Provider Documentation