learn how to connect to your Linux Virtual Machine (VM) terminal from an external via SSH.
🧩 Understand What SSH Is
SSH (Secure SHell) is a protocol used to securely log into another computer over a network. It encrypts all communication between two systems.
So if you’re connecting to your VM via SSH, you’re basically logging into it remotely.
🧪 Check If SSH Server Is Installed on Linux VM
Most Linux distributions do not install the SSH server by default for security reasons.
To check if openssh-server is installed:
sudo systemctl status sshIf you get something like “active (running)”, then SSH is already installed and running.
If not:
🟢 Install OpenSSH Server
For Ubuntu/Debian-based distros:
sudo apt update
sudo apt install ssh
After installing, start the SSH service:
sudo systemctl start sshEnable it to start automatically on boot:
sudo systemctl enable sshNetwork Configuration (Host Machine and Router)
This is the most critical part for external access and depends heavily on your setup.
Option 1: Bridged Networking (Simplest for external access on the same LAN)
- Concept: The VM behaves like a separate physical machine on your local network. It gets its own IP address from your router’s DHCP server, directly on the same subnet as your host machine and other devices.
- Configuration in Virtualization Software:
- VirtualBox: In VM settings -> Network -> Adapter 1 -> Attached to: Bridged Adapter. Select the appropriate physical network adapter of your host.
- VMware Workstation/Fusion: In VM settings -> Network Adapter -> Network connection: Bridged (Automatic) or select a specific physical adapter.
- Usage:
- Ensure your VM gets an IP address on the same subnet as your host.
- From any other device on the same local network (e.g., another PC, your phone connected to the same Wi-Fi), you can SSH directly to the VM’s IP address:
ssh username@VM_IP_ADDRESS
- Limitations: This still doesn’t allow direct access from outside your home/office network without further router configuration (Port Forwarding - see Option 3).
Option 2: NAT (Network Address Translation) with Port Forwarding (Most common for a VM behind a host)
- Concept: The VM gets an IP address on a private, internal network managed by the virtualization software. The host machine acts as a router for the VM, translating its private IP to the host’s IP. To allow external devices to connect, you need to set up Port Forwarding on the host.
- Configuration in Virtualization Software:
- VirtualBox: In VM settings -> Network -> Adapter 1 -> Attached to: NAT. Then click “Port Forwarding” button.
- Add a new rule:
- Name:
SSH(or anything descriptive) - Protocol:
TCP - Host IP: Leave blank (or your host’s specific IP if you have multiple)
- Host Port:
2222(or any unused port you choose on your host, not 22, to avoid conflicts if your host has an SSH server). - Guest IP:
VM_IP_ADDRESS(the IP you found in step I.3) - Guest Port:
22(SSH default port on the VM)
- Name:
- Add a new rule:
- VMware Workstation/Fusion: In VM settings -> Network Adapter -> Network connection: NAT. Then go to “Virtual Network Editor” (Edit menu) -> select the NAT network (usually VMnet8) -> click “NAT Settings…” -> “Add…”
- Host port:
2222(or chosen port) - Virtual machine IP address:
VM_IP_ADDRESS - Virtual machine port:
22 - Protocol:
TCP
- Host port:
- VirtualBox: In VM settings -> Network -> Adapter 1 -> Attached to: NAT. Then click “Port Forwarding” button.
- Usage (from an external terminal, on the same LAN as the host):
You would SSH to your host machine’s IP address (the one your host has on your LAN) on the Host Port you configured:
(Replacessh username@HOST_IP_ADDRESS -p 22222222with your chosen Host Port).
Option 3: Port Forwarding on Your Main Router (For truly external access over the internet)
-
Concept: If you want to access your VM from outside your home or office network (e.g., from a coffee shop, a friend’s house), you need to configure Port Forwarding on your home/office router. This assumes your VM is reachable on your local network (either via Bridged Adapter or NAT with Host Port Forwarding).
-
Steps:
- Identify your VM’s IP on your LAN:
- If using Bridged Adapter, it’s the
VM_IP_ADDRESSdirectly. - If using NAT with Host Port Forwarding, it’s your
HOST_IP_ADDRESS(and the specificHost Portyou set up in your virtualization software).
- If using Bridged Adapter, it’s the
- Find your Router’s Public IP Address: Go to a website like
whatismyip.comfrom your host machine. This is the IP address the outside world sees. - Access your Router’s Configuration: Open a web browser and type your router’s default gateway IP address (often
192.168.1.1or192.168.0.1). Log in with your router’s admin credentials. - Navigate to Port Forwarding Settings: Look for sections like “Port Forwarding,” “NAT,” “Virtual Servers,” or “Firewall.”
- Create a New Port Forwarding Rule:
- Service Name:
SSH_VM(or descriptive name) - External/Public Port:
2222(or any high, unused port you choose. Avoid using 22 directly from the internet as it’s a common target for attacks. A port like2222,30000,49152, etc., is better.) - Internal/Private IP Address: This is the IP of the machine on your local network that receives the traffic.
- If using Bridged Adapter:
VM_IP_ADDRESS - If using NAT (VirtualBox/VMware):
HOST_IP_ADDRESS
- If using Bridged Adapter:
- Internal/Private Port: This is the port on the internal machine that the external port traffic should be forwarded to.
- If using Bridged Adapter:
22(the SSH port on your VM) - If using NAT (VirtualBox/VMware): The
Host Portyou configured in your virtualization software (e.g.,2222).
- If using Bridged Adapter:
- Protocol:
TCP - Enable/Save: Apply the changes.
- Service Name:
- Identify your VM’s IP on your LAN:
-
Usage (from any external terminal over the internet):
ssh username@YOUR_ROUTER_PUBLIC_IP -p 2222(Replace
2222with theExternal/Public Portyou set on your router).- Consider Dynamic DNS (DDNS): If your public IP changes frequently (most home internet connections do), your router’s public IP will change. A DDNS service (like No-IP, DuckDNS, DynDNS) can map a hostname (e.g.,
myvm.ddns.net) to your dynamic public IP, so you can always use the hostname instead of the changing IP.
- Consider Dynamic DNS (DDNS): If your public IP changes frequently (most home internet connections do), your router’s public IP will change. A DDNS service (like No-IP, DuckDNS, DynDNS) can map a hostname (e.g.,
Option 4: Host-Only Networking (Only for Host-to-VM, not external)
- Concept: Creates a private network between the host and the VM(s) only. No access from other devices on the LAN or the internet. Useful for host-VM communication without exposing the VM.
- Usage: You would SSH from your host machine to the VM’s IP on the host-only network.
Option 5: Cloud VMs (e.g., AWS EC2, Google Cloud, Azure)
- Concept: Cloud providers handle most networking, but you need to configure their firewall/security groups.
- Steps:
- Ensure SSH is installed and running on the cloud VM (as in Section I).
- Configure Security Groups/Network Rules: In your cloud provider’s console, ensure that the security group (AWS, Azure) or firewall rules (Google Cloud) associated with your VM allow inbound TCP traffic on port 22 (or your custom SSH port) from your source IP address (or
0.0.0.0/0for testing, though less secure). - Use Public IP/DNS Name: Cloud VMs usually have a public IP address or a public DNS name assigned.
- Usage:
(Often uses SSH keys for authentication, which you’d configure in the cloud console and use with thessh username@VM_PUBLIC_IP_OR_DNS_NAME-iflag:ssh -i /path/to/your/key.pem username@VM_PUBLIC_IP).
Important Security Considerations:
- Use SSH Keys: Always prefer SSH key-based authentication over passwords, especially for external access. Generate a key pair (
ssh-keygen), put the public key on your VM’s~/.ssh/authorized_keys, and keep your private key secure on your local machine. - Disable Password Authentication for SSH: Once keys are set up, disable password logins in
/etc/ssh/sshd_config(PasswordAuthentication no). - Change Default SSH Port (22): As mentioned, using a non-standard port (e.g., 2222, 30000) for incoming external connections reduces automated scanning attempts.
- Firewalls on All Levels: Ensure firewalls are configured correctly on the VM, the host, and your router.
- Fail2Ban: Install
fail2banon your VM to automatically ban IPs that attempt brute-force SSH attacks. - Keep Software Updated: Regularly update your VM’s OS and SSH server.
Configure VM Firewall (UFW/firewalld):
Ensure the VM’s internal firewall allows incoming SSH connections (default port 22).
- Now, install the ufw package. (Ubuntu/Debian):
sudo apt install ufwsudo ufw allow ssh # This allows port 22/tcp OR sudo ufw allow 22/tcp
sudo ufw enable # If not already enabled
sudo ufw status verbose # helps to provide a richer and more detailed description of their operation.📍 Find the IP Address of the Linux VM
You need to know the IP address of your Linux VM so you can connect to it.
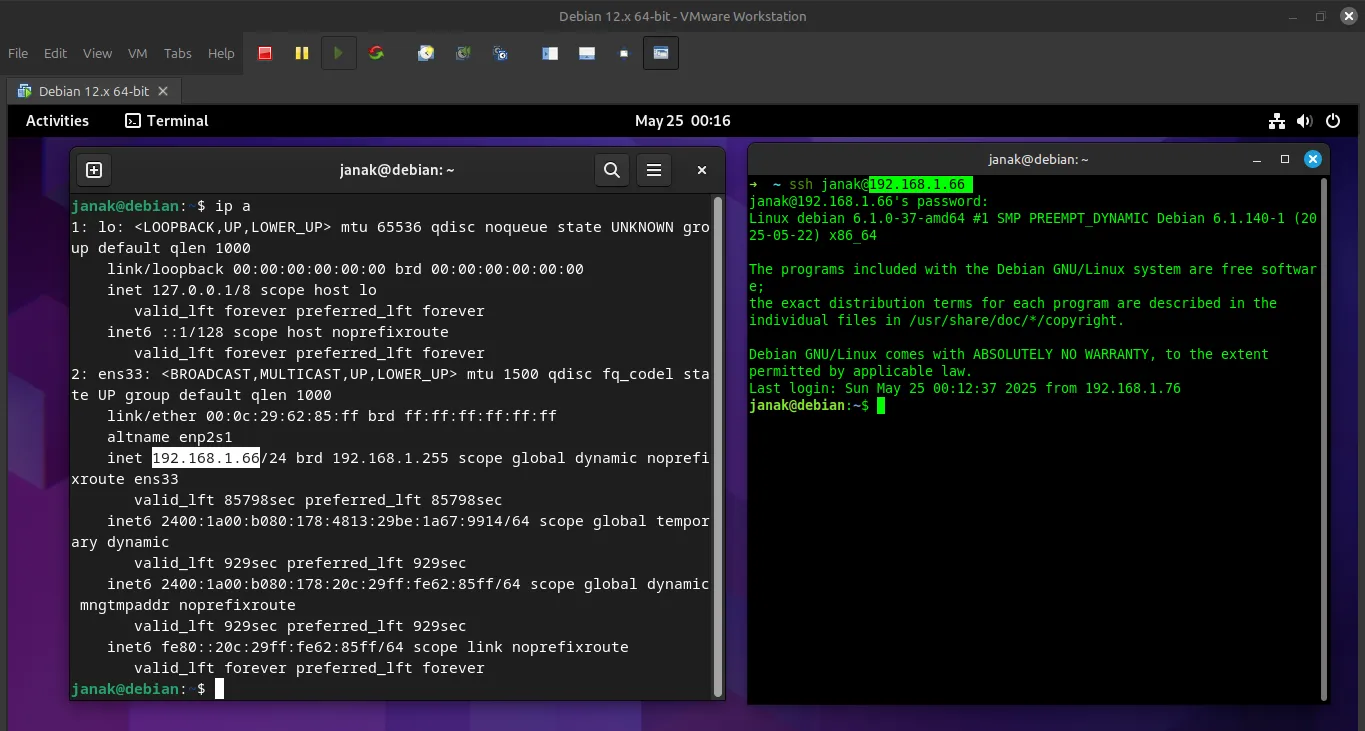
Run this command in the VM terminal:
ip a
# OR
ifconfig # if net-tools is installed
Look for something like:
inet 192.168.x.xThis is your local network IP address. Note it down.
Example output:
2: enp0s3: <BROADCAST,MULTICAST,UP> mtu 1500...
    inet 192.168.1.100/24 brd 192.168.1.255 scope global dynamic enp0s3
In this case, the IP is: 192.168.1.100
🖥️ Connect to the VM Using SSH From Host Machine
Now open a terminal on your host machine (your main OS, not the VM), and type:
ssh username@vm-ip-addressReplace:
usernamewith your Linux VM username.vm-ip-addresswith the IP you noted earlier.
Example:
ssh [email protected] -p 22Then press Enter and type the password when prompted.
If successful, you’ll now be inside the Linux VM’s terminal — but connected via SSH!
Set up SSH key-based authentication.
This method is more secure than using passwords and allows you to log in without typing a password every time.
🔐 What Is SSH Key-Based Authentication?
SSH keys are a pair of cryptographic keys:
- Private Key: You keep this on your local machine (host), and it must be kept secret.
- Public Key: You copy this to the server (your Linux VM). It’s safe to share.
When you connect via SSH, the system checks if your private key matches the public key on the server.
🧰 Step-by-Step Guide to Set Up SSH Keys
We’ll do this from your host machine (your main computer) and then copy the public key to your Linux VM.
✅ Step 1: Generate an SSH Key Pair on Your Host Machine
Open a terminal on your host machine (not the VM).
Type:
ssh-keygen -t rsa -b 4096This command generates a strong RSA key pair with 4096 bits.
You’ll see something like:
Generating public/private rsa key pair.
Enter file in which to save the key (/home/youruser/.ssh/id_rsa):
Just press Enter to accept the default location (~/.ssh/id_rsa).
Then it asks:
Enter passphrase (empty for no passphrase):You can leave it empty or set a passphrase for extra security.
✅ Done! Your keys are now created:
- Private key:
~/.ssh/id_rsa - Public key:
~/.ssh/id_rsa.pub
✅ Step 2: Copy the Public Key to Your Linux VM
There are two common ways to do this:
🔹 Option A: Use ssh-copy-id (Recommended)
Run this on your host machine:
sudo ssh-copy-id -i ~/.ssh/id_rsa.pub username@vm-ip-addressReplace:
usernamewith your Linux VM username.vm-ip-addresswith the IP of your VM (from earlier steps).
It will ask for your password, then copy the public key to the VM.
If successful, you’ll see:
Number of key(s) added: 1🔹 Option B: Manually Copy the Key (if ssh-copy-id not available)
On your host machine, view your public key:
cat ~/.ssh/id_rsa.pubCopy the entire line (it starts with ssh-rsa AAAAB3NzaC1yc2...).
Now, log in to your Linux VM normally via SSH:
ssh username@vm-ip-addressOnce inside, create the .ssh directory and edit the authorized_keys file:
mkdir -p ~/.ssh
chmod 700 ~/.ssh
nano ~/.ssh/authorized_keys
Paste the public key into the file and save it (Ctrl+O, Enter, Ctrl+X in nano).
Set correct permissions:
chmod 600 ~/.ssh/authorized_keys✅ Step 3: Test SSH Without Password
Now try logging in again:
ssh username@vm-ip-addressIf everything went well, you should be logged in without being asked for a password!
🔒 Optional: Disable Password Login (for extra security)
Once you’ve confirmed key-based login works, you can disable password-based SSH logins.
⚠️ Only do this if you’re sure your SSH key setup works.
Edit the SSH config file on your Linux VM:
sudo nano /etc/ssh/sshd_configFind these lines and change them to:
PasswordAuthentication no
ChallengeResponseAuthentication no
UsePAM no
Save and exit.
Then restart the SSH service:
sudo systemctl restart sshNow only users with the correct private key can log in.
🧠 Summary of Important Terms
| Term | Meaning |
|---|---|
~/.ssh/id_rsa | Your private SSH key (never share this!) |
~/.ssh/id_rsa.pub | Your public SSH key (can be shared safely) |
~/.ssh/authorized_keys | File on the server that contains trusted public keys |
ssh-keygen | Tool used to generate SSH key pairs |
ssh-copy-id | Tool to copy your public key to a remote server |
💡 Tips
- You can generate multiple SSH key pairs for different servers if needed.
- Always protect your private key — especially if you set a passphrase.
- On Windows, you can use WSL, Git Bash, or PuTTYgen to generate SSH keys.
Learn More:
- Setting up multiple keys for multiple VMs/servers.
- Using an SSH config file for easier connections.