Local Node.js App with HTTPS on Ubuntu 22.04 Using Self-Signed SSL, Nginx & Apache Reverse Proxy
Local Node.js App with HTTPS on Ubuntu 22.04 Using Self-Signed SSL, Nginx & Apache Reverse Proxy.
Quick 1-paragraph summary (follow this if you want just the steps)
- Create cert+key with OpenSSL (with SAN), store as
/etc/ssl/private/nodejs.janakkumarshrestha0.com.np.keyand/etc/ssl/certs/nodejs.janakkumarshrestha0.com.np.crt. - Add
127.0.0.1 nodejs.janakkumarshrestha0.com.npto/etc/hosts. - Configure Nginx (or Apache) to listen on HTTPS
443, using the cert and reverse proxying tohttp://127.0.0.1:3000. Enable and reload service. - Optionally add the cert to OS trust (
/usr/local/share/ca-certificates/...+sudo update-ca-certificates) or usemkcertto generate trusted local certs. (Full commands & file contents below with explanations.)
Environment assumptions
- Ubuntu 22.04 LTS
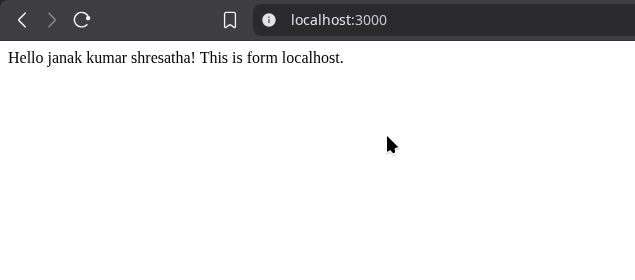
- Node app running locally at
http://localhost:3000(orhttp://127.0.0.1:3000). If your app binds to another address, update proxy_pass to match. - You will run commands in a terminal. All commands that need elevated privileges are prefixed with
sudo.
1 — Create a self-signed certificate (with Subject Alternative Name)
Modern browsers require SAN (Subject Alternative Name). We’ll create a small OpenSSL config file that includes SAN and then generate a 2048-bit key + certificate valid for 1 year.
- Create a temp openssl config file
~/nodejs-openssl.cnfwith SAN:
1
2
3
4
5
6
7
8
9
10
11
12
13
14
15
16
17
18
19
20
21
22
23
24
25
26
27
28
29
30
cat > ~/nodejs-openssl.cnf <<'EOF'
[ req ]
default_bits       = 2048
prompt             = no
default_md         = sha256
req_extensions     = req_ext
distinguished_name = dn

[ dn ]
C  = NP
ST = Bagmati
L  = Kathmandu
O  = Personal
CN = nodejs.janakkumarshrestha0.com.np

[ req_ext ]
subjectAltName = @alt_names

[ alt_names ]
DNS.1 = nodejs.janakkumarshrestha0.com.np
DNS.2 = localhost
IP.1  = 127.0.0.1

[ v3_ext ]
authorityKeyIdentifier=keyid,issuer
basicConstraints=CA:FALSE
keyUsage = digitalSignature, keyEncipherment
extendedKeyUsage = serverAuth
subjectAltName = @alt_names
EOF
Explanation:
CNis the Common Name (fallback). Modern TLS relies on SAN; we includesubjectAltNameunder[alt_names]to avoid browser warnings.DNS.1is the hostname,DNS.2localhost,IP.1127.0.0.1 so cert works with both name and IP tests.
- Generate private key and certificate (valid 365 days):
1
2
3
4
5
6
sudo openssl req -x509 -nodes -days 365 \
  -newkey rsa:2048 \
  -keyout /tmp/nodejs.janakkumarshrestha0.com.np.key \
  -out /tmp/nodejs.janakkumarshrestha0.com.np.crt \
  -config ~/nodejs-openssl.cnf \
  -extensions v3_ext
Explanation:
openssl req -x509creates a self-signed certificate (X.509).-nodesmeans “no DES” — do not encrypt the private key with a passphrase (so services like nginx/apache can read it without interactive password).-days 365makes cert valid for 365 days.-newkey rsa:2048creates a new 2048-bit RSA key.-keyoutand-outset temporary output paths.-configuses the config file we created with SAN.-extensions v3_extensures v3 extensions (including SAN) are added.
2 — Store cert and key in safe paths with correct permissions
We’ll move certs to canonical locations and set safe permissions.
- Create directories (if not exist) and move files:
1
2
3
4
5
6
sudo mkdir -p /etc/ssl/private
sudo mkdir -p /etc/ssl/certs
sudo mv /tmp/nodejs.janakkumarshrestha0.com.np.key /tmp/nodejs.janakkumarshrestha0.com.np.crt /etc/ssl/private/
# Move certificate to certs for clarity:
sudo mv /etc/ssl/private/nodejs.janakkumarshrestha0.com.np.crt /etc/ssl/certs/nodejs.janakkumarshrestha0.com.np.crt
sudo mv /etc/ssl/private/nodejs.janakkumarshrestha0.com.np.key /etc/ssl/private/nodejs.janakkumarshrestha0.com.np.key
Note: we moved the certificate to /etc/ssl/certs and kept the key in /etc/ssl/private.
- Set permissions:
1
2
3
4
5
6
7
# Certificate readable by everyone
sudo chmod 644 /etc/ssl/certs/nodejs.janakkumarshrestha0.com.np.crt
sudo chown root:root /etc/ssl/certs/nodejs.janakkumarshrestha0.com.np.crt

# Private key only readable by root (600)
sudo chmod 600 /etc/ssl/private/nodejs.janakkumarshrestha0.com.np.key
sudo chown root:root /etc/ssl/private/nodejs.janakkumarshrestha0.com.np.key
Explanation:
- Certificates are public;
644(owner read/write, group/world read) is fine. - Private keys are sensitive —
600ensures onlyrootcan read/write. Nginx/Apache running as root initially reads the key then drops privileges; keeping key limited to root reduces risk if non-root access exists.
3 — Make nodejs.janakkumarshrestha0.com.np resolve locally
Edit /etc/hosts so that the hostname resolves to your machine (loopback). Add this single exact line.
- Add the line:
1
2
3
4
5
# Backup hosts first
sudo cp /etc/hosts /etc/hosts.bak

# Add mapping (this is the exact line to add)
echo '127.0.0.1 nodejs.janakkumarshrestha0.com.np' | sudo tee -a /etc/hosts
Exact line to add (copy/paste into /etc/hosts if you prefer a text editor):
1
127.0.0.1 nodejs.janakkumarshrestha0.com.np
Explanation:
/etc/hostsmaps names to IPs locally — this makes your OS resolve the hostname to the local loopback without any DNS lookup.
4 — Full Nginx configuration (HTTPS reverse proxy to localhost:3000)
We’ll create a server block file, enable it, test, and reload.
- Install Nginx if you don’t have it:
1
2
sudo apt update
sudo apt install -y nginx
- Create Nginx site file at
/etc/nginx/sites-available/nodejs.janakkumarshrestha0.com.np:
1
2
3
4
5
6
7
8
9
10
11
12
13
14
15
16
17
18
19
20
21
22
23
24
25
26
27
28
29
30
31
32
33
34
35
36
37
38
39
40
41
42
43
44
45
46
47
48
49
50
sudo tee /etc/nginx/sites-available/nodejs.janakkumarshrestha0.com.np > /dev/null <<'EOF'
# /etc/nginx/sites-available/nodejs.janakkumarshrestha0.com.np
server {
    # Listen on IPv4 and IPv6, HTTPS
    listen 443 ssl;
    listen [::]:443 ssl;

    # Your hostname
    server_name nodejs.janakkumarshrestha0.com.np;

    # Paths to certificate and private key
    ssl_certificate     /etc/ssl/certs/nodejs.janakkumarshrestha0.com.np.crt;
    ssl_certificate_key /etc/ssl/private/nodejs.janakkumarshrestha0.com.np.key;

    # SSL settings (basic, modern safe defaults)
    ssl_protocols TLSv1.2 TLSv1.3;
    ssl_prefer_server_ciphers on;
    ssl_session_cache shared:SSL:10m;
    ssl_session_timeout 10m;

    # Proxy settings
    location / {
        proxy_pass         http://127.0.0.1:3000/;
        proxy_http_version 1.1;

        # Preserve the original Host header (so your app sees requested host)
        proxy_set_header   Host $host;

        # Forward real client IPs
        proxy_set_header   X-Real-IP $remote_addr;
        proxy_set_header   X-Forwarded-For $proxy_add_x_forwarded_for;

        # Indicate the original protocol used by client
        proxy_set_header   X-Forwarded-Proto $scheme;

        # WebSocket support
        proxy_set_header   Upgrade $http_upgrade;
        proxy_set_header   Connection $connection_upgrade;
    }
}

# Optional HTTP -> HTTPS redirect
server {
    listen 80;
    listen [::]:80;
    server_name nodejs.janakkumarshrestha0.com.np;

    return 301 https://$host$request_uri;
}
EOF
Explanation of important directives:
listen 443 ssl;— tells nginx to accept HTTPS on port 443.server_name— hostname this server block responds to.ssl_certificate/ssl_certificate_key— paths to the cert and key we created.ssl_protocols— which TLS versions to allow; we enable TLS 1.2 and 1.3.proxy_pass http://127.0.0.1:3000/;— forwards requests to your Node app.proxy_set_header Host $host;— preserves Host header (your app sees requested hostname).X-Real-IP,X-Forwarded-For— pass client IP info to backend (useful for logging).Upgrade&Connectionheaders — required to proxy WebSockets.
- Create the
$connection_upgradevariable so Connection header is correct (some nginx versions require):
Append this to file above http block? If using default Ubuntu nginx, you can set inside the server block — but simpler: add this at top of the same file (just before first server {):
We already used $connection_upgrade — some nginx configurations require setting:
1
2
3
4
# (Only if you get "unknown variable $connection_upgrade" errors)
# Add the following line near the top of /etc/nginx/nginx.conf within 'http { ... }'
# Or you can add a fast workaround at top of this site file:
sudo sed -n '1,1p' /etc/nginx/sites-available/nodejs.janakkumarshrestha0.com.np >/dev/null || true
(Usually modern nginx supports $connection_upgrade mapping via map in global nginx.conf. If you see errors, use the troubleshooting section below.)
🧱 Fixing the “unknown $connection_upgrade variable” Error
If you see:
1
unknown "connection_upgrade" variable
edit /etc/nginx/nginx.conf and inside the http { ... } block (before any server {}) add:
1
2
3
4
map $http_upgrade $connection_upgrade {
    default upgrade;
    '' close;
}
- Enable site and reload Nginx:
1
2
3
sudo ln -s /etc/nginx/sites-available/nodejs.janakkumarshrestha0.com.np /etc/nginx/sites-enabled/
sudo nginx -t
sudo systemctl reload nginx
Explanation:
ln -s ... sites-enabledenables the site (Ubuntu loads files fromsites-enabled).nginx -ttests configuration syntax.systemctl reload nginxreloads configuration without dropping connections.
- Permissions (already discussed): ensure
/etc/ssl/private/...keyis600root:root so only root reads it.
5 — Full Apache configuration (HTTPS reverse proxy)
If you prefer Apache instead of Nginx, here’s a complete Apache VirtualHost.
- Install Apache if you don’t have it:
1
2
sudo apt update
sudo apt install -y apache2
- Enable required Apache modules:
1
2
3
4
5
sudo a2enmod ssl
sudo a2enmod proxy
sudo a2enmod proxy_http
sudo a2enmod headers
sudo a2enmod remoteip
Explanation:
ssl— enables TLS support.proxyandproxy_http— enable reverse proxy to HTTP backend.headers— useful for setting headers.remoteip— optional, allow Apache to modify the perceived remote IP (if behind another proxy).
- Create the Apache site file
/etc/apache2/sites-available/nodejs.janakkumarshrestha0.com.np.confwith full content:
1
2
3
4
5
6
7
8
9
10
11
12
13
14
15
16
17
18
19
20
21
22
23
24
25
26
27
28
29
30
31
32
33
34
35
36
37
sudo tee /etc/apache2/sites-available/nodejs.janakkumarshrestha0.com.np.conf > /dev/null <<'EOF'
<VirtualHost *:443>
    ServerName nodejs.janakkumarshrestha0.com.np

    # Path to the certificate and key
    SSLEngine on
    SSLCertificateFile    /etc/ssl/certs/nodejs.janakkumarshrestha0.com.np.crt
    SSLCertificateKeyFile /etc/ssl/private/nodejs.janakkumarshrestha0.com.np.key

    # Optional SSL settings for stronger security
    SSLProtocol             all -SSLv3 -TLSv1 -TLSv1.1
    SSLOptions              +StrictRequire
    # SSLHonorCipherOrder     on
    # SSLCipherSuite         HIGH:!aNULL:!MD5

    # Preserve original host header
    ProxyPreserveHost On

    # Proxy pass everything to the Node app
    ProxyPass        / http://127.0.0.1:3000/
    ProxyPassReverse / http://127.0.0.1:3000/

    # Forward client IP to backend
    RequestHeader set X-Forwarded-Proto "https"
    RequestHeader set X-Forwarded-Port "443"

    # Logging (optional)
    ErrorLog ${APACHE_LOG_DIR}/nodejs-error.log
    CustomLog ${APACHE_LOG_DIR}/nodejs-access.log combined
</VirtualHost>

# Optional: Redirect HTTP to HTTPS
<VirtualHost *:80>
    ServerName nodejs.janakkumarshrestha0.com.np
    Redirect permanent / https://nodejs.janakkumarshrestha0.com.np/
</VirtualHost>
EOF
Explanation:
<VirtualHost *:443>— listens on port 443 for HTTPS.SSLEngine on— enables SSL for this virtual host.SSLCertificateFile/SSLCertificateKeyFile— point to the files we installed.ProxyPass/ProxyPassReverse— forward requests to backendhttp://127.0.0.1:3000/.ProxyPassReversechanges response headers that refer to backend URLs so redirects work.ProxyPreserveHost On— preserves incoming Host header for backend.RequestHeader set X-Forwarded-Proto— tell backend the request came in via HTTPS.
- Enable site and reload Apache:
1
2
3
sudo a2ensite nodejs.janakkumarshrestha0.com.np.conf
sudo apache2ctl configtest
sudo systemctl reload apache2
Explanation:
a2ensitecreates symlink insites-enabled.apache2ctl configtestchecks syntax.systemctl reload apache2applies new config.
6 — Testing the setup
6.1 Basic curl (browser & CLI)
Because you added /etc/hosts, the name resolves to 127.0.0.1.
- Quick insecure test with
curl(ignores TLS trust checks):
1
curl -v --insecure https://nodejs.janakkumarshrestha0.com.np/
Explanation:
-vverbose: shows TLS handshake and headers.--insecuretells curl not to validate the certificate with a CA. Useful for initial check if server serves TLS correctly.
- Test without
--insecure(after you add cert to system trust — explained below):
1
curl -v https://nodejs.janakkumarshrestha0.com.np/
If trust is not added yet, curl will report SSL: certificate subject name or self signed certificate errors.
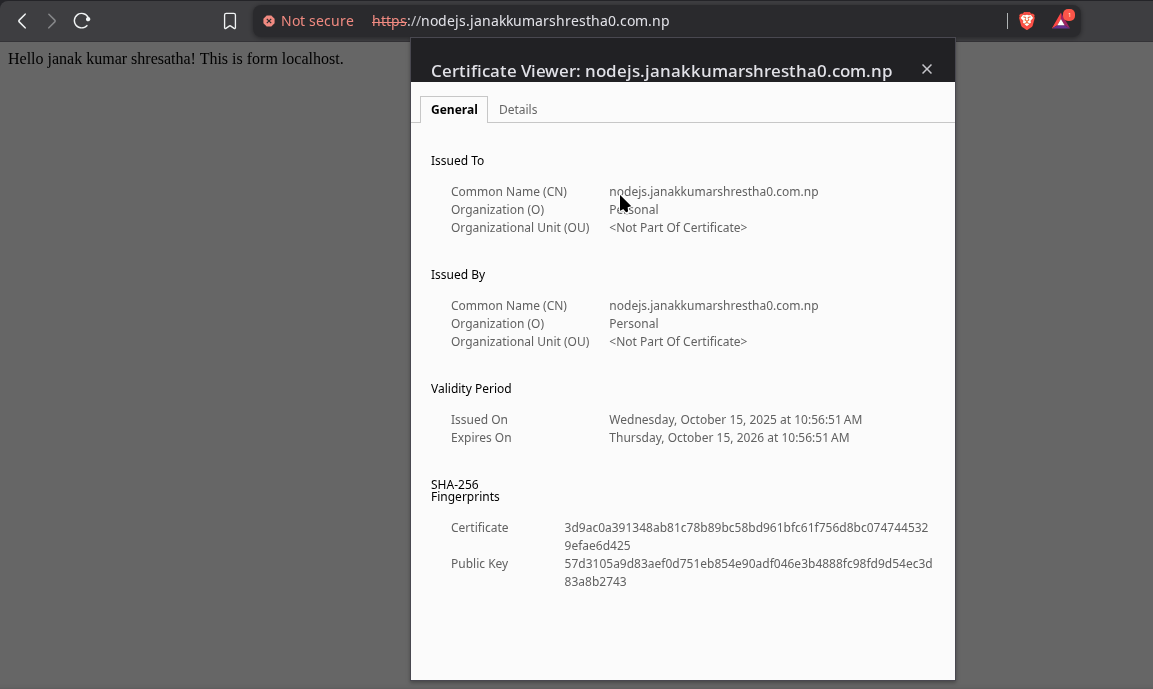
6.2 Check certificate with openssl s_client
1
openssl s_client -connect nodejs.janakkumarshrestha0.com.np:443 -servername nodejs.janakkumarshrestha0.com.np
Explanation:
-connect host:portopens TLS connection.-servernamesets SNI (Server Name Indication) so the server returns the certificate for that name.- Output shows certificate chain, subject, issuer, expiry dates, and certificate content.
6.3 Browser behavior & trusting the cert
Quick local trust (systemwide, Ubuntu)
Add the certificate as a trusted CA certificate (works for most system apps and Chrome/Chromium; Firefox uses its NSS store—instructions below):
- Copy cert to local CA folder and update trust:
1
2
sudo cp /etc/ssl/certs/nodejs.janakkumarshrestha0.com.np.crt /usr/local/share/ca-certificates/nodejs.janakkumarshrestha0.com.np.crt
sudo update-ca-certificates
Explanation:
/usr/local/share/ca-certificates/is where local CA certs can be added.update-ca-certificatesinstalls them in system trust store used by OpenSSL and Chromium/Chrome (on Ubuntu) after restart.
- Restart browser (Chrome/Chromium) and try visiting
https://nodejs.janakkumarshrestha0.com.np/— Chrome should accept it.
Firefox (uses its own NSS DB)
Firefox does not use the system trust store by default. Use certutil (from libnss3-tools) to add cert to your Firefox profile:
- Install
libnss3-toolsif not present:
1
2
sudo apt update
sudo apt install -y libnss3-tools
- Find your Firefox profile (example command):
1
ls ~/.mozilla/firefox/*.default-release || ls ~/.mozilla/firefox/*.default || true
Pick the profile folder returned, for example: ~/.mozilla/firefox/abcd1234.default-release.
- Import the certificate into that profile’s cert DB:
1
2
3
# Replace PROFILE_DIR with the actual directory returned above
PROFILE_DIR=$(ls -d ~/.mozilla/firefox/*.default-release 2>/dev/null || ls -d ~/.mozilla/firefox/*.default 2>/dev/null)
certutil -d sql:$PROFILE_DIR -A -t "TCu,Cu,Tu" -n "Local nodejs cert" -i /etc/ssl/certs/nodejs.janakkumarshrestha0.com.np.crt
Explanation:
certutil -Aadds a trusted certificate.-t "TCu,Cu,Tu"sets trust flags: trusted CA for issuing websites and email. (Beginners: just run command; if it fails, confirm profile path.)
Alternative: use mkcert to avoid manual trust steps (recommended for local development)
mkcert creates a local CA and automatically trusts it in system/NSS stores, making locally-issued certs trusted by browsers without warnings.
Install mkcert and use:
1
2
3
4
5
6
7
8
9
10
11
12
13
14
15
16
17
18
19
20
# Install prerequisites and mkcert (typical approach)
sudo apt update
sudo apt install -y libnss3-tools
# Install mkcert via snap (snap is commonly available)
sudo snap install mkcert --classic

# Create and install a local CA (only once)
mkcert -install

# Generate certs for the hostname and localhost
mkcert nodejs.janakkumarshrestha0.com.np localhost 127.0.0.1 ::1

# mkcert produces files like:
# nodejs.janakkumarshrestha0.com.np+2.pem  (cert)
# nodejs.janakkumarshrestha0.com.np+2-key.pem (key)
# Move them to /etc/ssl if desired:
sudo mv nodejs.janakkumarshrestha0.com.np+2.pem /etc/ssl/certs/nodejs.janakkumarshrestha0.com.np.crt
sudo mv nodejs.janakkumarshrestha0.com.np+2-key.pem /etc/ssl/private/nodejs.janakkumarshrestha0.com.np.key
sudo chmod 600 /etc/ssl/private/nodejs.janakkumarshrestha0.com.np.key
sudo chmod 644 /etc/ssl/certs/nodejs.janakkumarshrestha0.com.np.crt
Explanation:
mkcert -installinstalls a local CA and trusts it in system and Firefox stores (so generated certs will not trigger browser warnings).mkcert hostnamegenerates a cert and key for the hostname and automatically trusted.snap install mkcert --classicis a typical install route — ifsnapis not available, refer to mkcert docs.
7 — Troubleshooting tips (common problems & fixes)
1 nginx -t fails / nginx refuses to reload
Run
sudo nginx -tto test; fix syntax errors indicated by the test. Example:- Unknown directive / missing semicolon — open the file and check lines.
Check logs:
sudo journalctl -u nginx --no-pager --since "10 minutes ago"and/var/log/nginx/error.log.
2 apache2ctl configtest fails
sudo apache2ctl configtestprints reason; common issues are missing modules. Ensureproxy,proxy_http,sslare enabled (sudo a2enmod proxy proxy_http ssl).
3 Port conflicts (another service listening on 443)
- Check who is listening:
sudo ss -tulpn | grep :443orsudo lsof -i :443. - If Apache is running and you want Nginx, stop/disable conflicting service:
sudo systemctl stop apache2/sudo systemctl disable apache2. Or pick one server to use and disable the other.
4 Firewall (ufw) blocking connections
Check
sudo ufw status. To allow HTTPS locally:1 2
sudo ufw allow 443/tcp sudo ufw allow 80/tcp
Note: On a strictly local dev machine you may not need firewall changes if you connect from the same machine, but for remote access they are required.
5 SELinux
- Ubuntu uses AppArmor rather than SELinux by default. If you run this on RHEL/CentOS/Fedora with SELinux enabled, ensure contexts for
/etc/ssl/privatearehttpd_config_tor userestoreconas appropriate. For Ubuntu, usually not applicable.
6 unknown variable $connection_upgrade or WebSocket issues
For WebSocket proxying in nginx, ensure you include:
1
2
3
4
map $http_upgrade $connection_upgrade {
    default upgrade;
    ''      close;
}
in
http { ... }section of/etc/nginx/nginx.conf. If you don’t want to edit nginx.conf, use:1 2
proxy_set_header Upgrade $http_upgrade; proxy_set_header Connection "upgrade";
instead of
$connection_upgrade.
7 Backend logs — 502 / 504 errors
Check Node app is running and listening on
127.0.0.1:3000:1 2 3
ss -tulpn | grep 3000 # or sudo lsof -i :3000
Check app logs — the app might have crashed.
8 — Security note (self-signed certs vs production)
- Self-signed certs are fine for local development, but they are not trusted by browsers or other systems by default. They do not prove identity and are vulnerable to spoofing if used across networks.
- Production recommendation: Use a trusted CA such as Let’s Encrypt for public sites. For automated issuance on servers reachable from the internet, Let’s Encrypt’s
certbotwith HTTP validation is common. For domains whose public DNS you control but are not web-accessible, use Let’s Encrypt DNS challenge (API-based) to prove domain control. - For local development, mkcert is much easier — it creates a local CA and auto-trusts it on your machine so browsers stop complaining. For anything public-facing, use a real CA.
9 — One-page checklist / step order you can run
- Create the openssl config
~/nodejs-openssl.cnf(copy from step 1). - Run the
openssl req -x509 ...command to create cert & key (step 1). - Move cert/key to
/etc/ssl/certsand/etc/ssl/privateand set permissions (step 2). - Add
127.0.0.1 nodejs.janakkumarshrestha0.com.npto/etc/hosts(step 3). - Install Nginx or Apache and create the config file(s) exactly as shown (steps 4 & 5).
- Enable site and reload
nginxorapache2and test withcurlandopenssl s_client(step 6). - Optionally add cert to system trust (
/usr/local/share/ca-certificates/...+sudo update-ca-certificates) or usemkcert. - Troubleshoot using the commands in step 7.
Appendix — exact files & commands in one place (copy/paste friendly)
OpenSSL config (create once)
1
2
3
4
5
6
7
8
9
10
11
12
13
14
15
16
17
18
19
20
21
22
23
24
25
26
27
28
29
30
cat > ~/nodejs-openssl.cnf <<'EOF'
[ req ]
default_bits       = 2048
prompt             = no
default_md         = sha256
req_extensions     = req_ext
distinguished_name = dn

[ dn ]
C  = NP
ST = Bagmati
L  = Kathmandu
O  = Personal
CN = nodejs.janakkumarshrestha0.com.np

[ req_ext ]
subjectAltName = @alt_names

[ alt_names ]
DNS.1 = nodejs.janakkumarshrestha0.com.np
DNS.2 = localhost
IP.1  = 127.0.0.1

[ v3_ext ]
authorityKeyIdentifier=keyid,issuer
basicConstraints=CA:FALSE
keyUsage = digitalSignature, keyEncipherment
extendedKeyUsage = serverAuth
subjectAltName = @alt_names
EOF
Generate cert & key
1
2
3
4
5
6
sudo openssl req -x509 -nodes -days 365 \
  -newkey rsa:2048 \
  -keyout /tmp/nodejs.janakkumarshrestha0.com.np.key \
  -out /tmp/nodejs.janakkumarshrestha0.com.np.crt \
  -config ~/nodejs-openssl.cnf \
  -extensions v3_ext
Move to final paths + permissions
1
2
3
4
5
6
sudo mkdir -p /etc/ssl/private /etc/ssl/certs
sudo mv /tmp/nodejs.janakkumarshrestha0.com.np.crt /etc/ssl/certs/nodejs.janakkumarshrestha0.com.np.crt
sudo mv /tmp/nodejs.janakkumarshrestha0.com.np.key /etc/ssl/private/nodejs.janakkumarshrestha0.com.np.key
sudo chown root:root /etc/ssl/certs/nodejs.janakkumarshrestha0.com.np.crt /etc/ssl/private/nodejs.janakkumarshrestha0.com.np.key
sudo chmod 644 /etc/ssl/certs/nodejs.janakkumarshrestha0.com.np.crt
sudo chmod 600 /etc/ssl/private/nodejs.janakkumarshrestha0.com.np.key
/etc/hosts (exact line)
1
127.0.0.1 nodejs.janakkumarshrestha0.com.np
Add it with:
1
2
sudo cp /etc/hosts /etc/hosts.bak
echo '127.0.0.1 nodejs.janakkumarshrestha0.com.np' | sudo tee -a /etc/hosts
Full Nginx file (exact path)
/etc/nginx/sites-available/nodejs.janakkumarshrestha0.com.np (Use the same content as shown previously in Step 4; you can create it with:)
1
2
3
sudo tee /etc/nginx/sites-available/nodejs.janakkumarshrestha0.com.np > /dev/null <<'EOF'
# (paste the Nginx server block content from earlier)
EOF
Enable + reload:
1
2
3
sudo ln -s /etc/nginx/sites-available/nodejs.janakkumarshrestha0.com.np /etc/nginx/sites-enabled/
sudo nginx -t
sudo systemctl reload nginx
Full Apache file (exact path)
/etc/apache2/sites-available/nodejs.janakkumarshrestha0.com.np.conf (Use the same content as shown previously in Step 5; create with:)
1
2
3
sudo tee /etc/apache2/sites-available/nodejs.janakkumarshrestha0.com.np.conf > /dev/null <<'EOF'
# (paste the Apache VirtualHost content from earlier)
EOF
Enable and reload Apache:
1
2
3
4
sudo a2enmod ssl proxy proxy_http headers
sudo a2ensite nodejs.janakkumarshrestha0.com.np.conf
sudo apache2ctl configtest
sudo systemctl reload apache2
Quick tests
1
2
3
4
5
# Test HTTPS with curl (insecure)
curl -v --insecure https://nodejs.janakkumarshrestha0.com.np/

# Test HTTPS with openssl (SNI)
openssl s_client -connect nodejs.janakkumarshrestha0.com.np:443 -servername nodejs.janakkumarshrestha0.com.np
Add cert to system trust (Ubuntu)
1
2
3
sudo cp /etc/ssl/certs/nodejs.janakkumarshrestha0.com.np.crt /usr/local/share/ca-certificates/nodejs.janakkumarshrestha0.com.np.crt
sudo update-ca-certificates
# Restart browser after this
mkcert option (recommended for local dev)
1
2
3
4
5
6
sudo apt update
sudo apt install -y libnss3-tools
sudo snap install mkcert --classic
mkcert -install
mkcert nodejs.janakkumarshrestha0.com.np localhost 127.0.0.1 ::1
# Move mkcert outputs to /etc/ssl paths if desired, then set permissions
🧭 One-Paragraph Summary
To enable HTTPS for a local Node.js app on Ubuntu 22.04: map your custom domain in /etc/hosts, generate a self-signed certificate with OpenSSL, store it under /etc/ssl/, configure Nginx or Apache as a reverse proxy with SSL, test using curl -vk, and add the certificate to your local trust store (or use mkcert). For production, replace the self-signed certificate with a Let’s Encrypt-issued one.