A Beginner’s Guide to LVM on Ubuntu
LVM, or Logical Volume Management, is a powerful tool that provides a more flexible way to manage storage than traditional partitioning. It allows you to resize, move, and create file systems without worrying about the physical layout of the hard drive. Here’s a step-by-step guide for a beginner to practice LVM on an Ubuntu system, using a virtual machine is highly recommended for this practice.
Install LVM2
First, you need to ensure the LVM2 package is installed on your Ubuntu system. Open a terminal and run the following command:
sudo apt update && sudo apt install lvm2 -y- sudo: This command is used to execute a command with superuser privileges, which are required to install software and manage system configurations.
- apt update: This command updates the list of available packages and their versions from the repositories.
- apt install lvm2: This command installs the LVM2 package.
- -y: This flag automatically answers “yes” to any prompts, making the installation non-interactive.
Create a Physical Volume (PV)
A physical volume (PV) is a physical disk or partition that is designated for use by LVM. It’s the building block of an LVM setup. For this guide, we’ll assume you have a spare disk named /dev/sdc. If you don’t have a spare disk, you can create a partition on an existing disk and use that. Use the following command to create a PV:
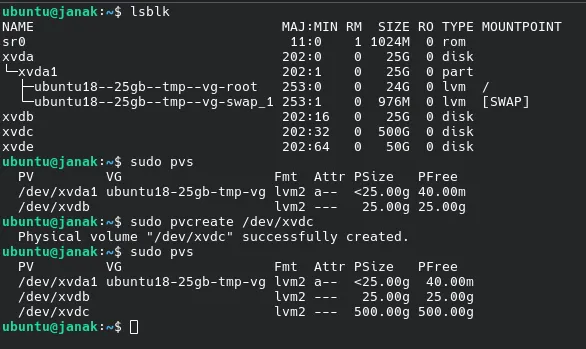
sudo pvcreate /dev/xvdc- pvcreate: This command initializes a physical volume for use by LVM.
- /dev/sdb: This is the name of the disk you are using. Important: Make sure to replace this with the correct device name on your system. You can use
lsblkto list your disks.
To check the status of your newly created physical volume, use the pvdisplay command:
sudo pvdisplay
# or
sudo pvs-
pvdisplay: This command displays the attributes of physical volumes, showing information like the PV name, size, and whether it’s part of a volume group.
-
pvs: This commands displays the short summary of physical volumes.
Create a Volume Group (VG)
A volume group (VG) pools one or more physical volumes into a single logical entity. It’s the central storage space from which you’ll create logical volumes. Create a VG named janak-vg using your new physical volume:
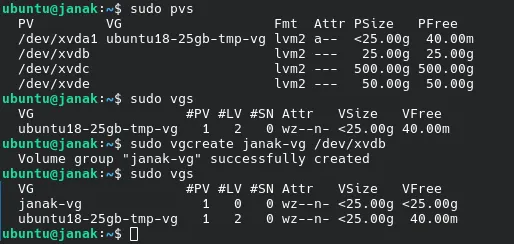
sudo vgcreate janak-vg /dev/xvdb- vgcreate: This command creates a new volume group.
- janak-vg: This is the name you are giving to your new volume group. You can name it anything you like.
- /dev/sdb: This is the PV you are adding to the VG.
To verify the creation of the volume group, you can use the vgdisplay command:
sudo vgdisplay
# or
sudo vgs- vgdisplay: This command displays the attributes of volume groups, including the VG name, size, and the number of physical volumes it contains.
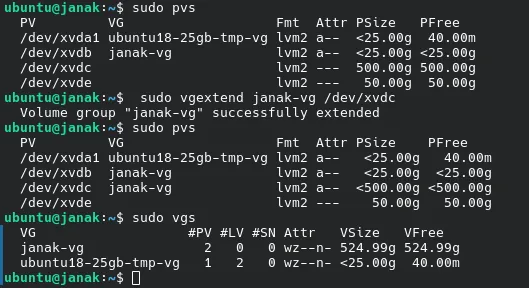
Extend the Volume Group.
- Use the
vgextendcommand to add the newly created PV to your existing volume group.
```bash
sudo vgextend janak-vg /dev/xbdc
```

(Replace `janak-vg` with the name of your volume group, e.g., `janak-vg`.)
Create a Logical Volume (LV)
A logical volume (LV) is the equivalent of a partition in a traditional setup. It’s a “virtual” partition created from the free space in a volume group. This is the volume that you will format and mount. Create a 5GB logical volume named janak-data-lv within janak-vg:
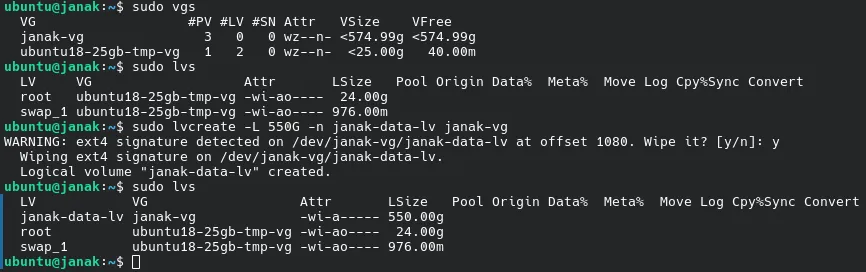
sudo lvcreate -L 550G -n janak-data-lv janak-vg
# or
sudo lvcreate -l +100%FREE -n janak-data-lv janak-vg- lvcreate: This command creates a new logical volume.
- -L 5G: This flag specifies the size of the logical volume.
5Gmeans 5 gigabytes. - -n janak-data-lv: This flag specifies the name of the new logical volume.
- janak-vg: This is the name of the volume group from which the LV will be created.
To see your new logical volume, use the lvdisplay command:
sudo lvdisplay
# or
sudo lvs- lvdisplay: This command displays the attributes of logical volumes, including the LV path, size, and the volume group it belongs to.
The difference between the options -L and -l in the lvextend command is:
-
-L: Specifies the new size or the amount to extend the logical volume by in absolute terms, using size units like G (gigabytes), M (megabytes), etc. For example,-L +5Gmeans increase the logical volume size by 5 gigabytes. -
-l: Specifies the size to extend the logical volume by in terms of logical extents (LEs), which are units used internally by LVM. You can specify a number of extents or use+100%FREEto use all remaining free space in the volume group.
To summarize:
| Option | Usage | Example | Meaning |
|---|---|---|---|
| -L | Specify size with units (e.g., G, M, etc.) | -L +5G | Increase logical volume by 5 gigabytes |
| -l | Specify size in logical extents | -l +100%FREE | Increase logical volume by all free extents |
Thus, -L is for size units, and -l is for extents within LVM’s internal allocation system.
Format and Mount the Logical Volume
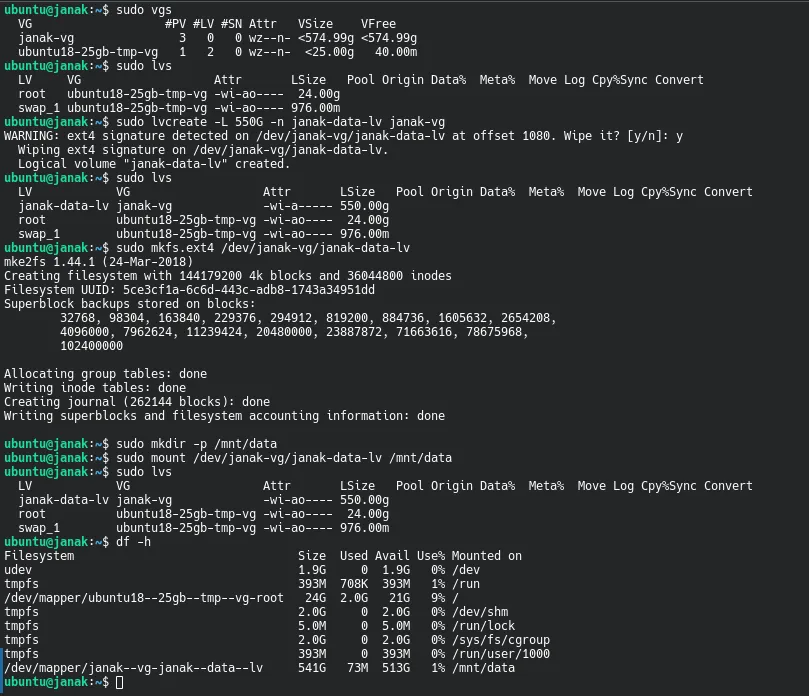
The logical volume is now a raw block device and needs to be formatted with a file system before it can be used. We’ll use the ext4 file system. The path to your new LV will be /dev/janak-vg/janak-data-lv.
sudo mkfs.ext4 /dev/janak-vg/janak-data-lv- mkfs.ext4: This command creates an ext4 file system on the specified device.
mkfsstands for “make file system.” - /dev/janak-vg/janak-data-lv: This is the full path to your new logical volume. LVM creates a symbolic link to the device file in the
/devdirectory.
Now that the LV is formatted, you can mount it to make it accessible to your system. First, create a mount point, which is a directory where the LV will be attached.
sudo mkdir -p /mnt/data-
mkdir: This command creates a new directory.
-
-p → the
-pflag means “parents”.- It creates all necessary parent directories if they don’t exist (e.g.,
/mntand then/mnt/data). - If the directory already exists, it does not throw an error — it just silently succeeds.
- It creates all necessary parent directories if they don’t exist (e.g.,
-
/mnt/data: This is the name of the directory where you will mount the LV. You can choose any name and location.
Next, mount the logical volume to the new directory:
sudo mount /dev/janak-vg/janak-data-lv /mnt/data- mount: This command attaches the file system from a device to a directory.
- /dev/janak-vg/janak-data-lv: The source device to be mounted.
- /mnt/data: The destination mount point.
Making Logical Volumes Permanent
To ensure your logical volume’s storage is accessible after a reboot, you need to configure your system to automatically mount it during startup. This is done by adding an entry for the volume in the /etc/fstab file.
Find the Logical Volume’s UUID
First, you need to find the unique identifier (UUID) of your logical volume. Using the UUID is the most reliable method, as it ensures the correct volume is always mounted, even if its path changes.
- Command:
sudo blkid /dev/your_vg_name/your_lv_name
Explanation:
sudo blkid: The command used to locate and print the attributes of a block device./dev/your_vg_name/your_lv_name: The full path to your logical volume. You can find this path with thesudo lvscommand.
Example Output:
/dev/mapper/my_vg-my_lv: UUID="9e64e9a3-5c74-4b55-a249-14a09e0a0f5a" TYPE="ext4"Copy the long string of characters within the quotation marks after UUID=.
Step 2: Create a Mount Point Directory
A mount point is an empty directory that acts as the entry point for your logical volume. If you don’t already have one, create it.
- Command:
sudo mkdir /mnt/data_storage
Explanation:
sudo mkdir: The command to create a new directory./mnt/data_storage: The path to your new mount point. You can name this anything you want, but it’s a good practice to create mount points in the/mntdirectory.
Step 3: Edit the /etc/fstab File
The /etc/fstab file is the system’s configuration file for mounting filesystems at boot. You’ll add a new line to this file. Use a text editor like nano.
- Command:
sudo nano /etc/fstab
Explanation:
sudo nano: Opens thenanotext editor with administrative privileges.
Add the following line to the end of the file. Replace the UUID and mount point with your own information.
UUID="9e64e9a3-5c74-4b55-a249-14a09e0a0f5a" /mnt/data_storage ext4 defaults 0 2Field Explanations:
UUID="...": The unique identifier of your logical volume./mnt/data_storage: The directory where the volume will be mounted.ext4: The filesystem type of your logical volume. If you used a different filesystem (likexfs), specify that instead.defaults: A common set of mount options that are suitable for most situations.0: Thedumpfield.0means the filesystem will not be backed up by thedumputility.2: Thefsckfield.2meansfsckwill check the integrity of this filesystem at boot, after the root filesystem is checked.
Press Ctrl + O to save the file and then Ctrl + X to exit nano.
Step 4: Test the fstab Entry
It’s crucial to test your new fstab entry before rebooting to ensure there are no errors.
- Command:
sudo mount -a
Explanation:
sudo mount -a: This command tells the system to mount all filesystems listed in/etc/fstab.
If there are no error messages, your logical volume has been successfully mounted. You can now verify that everything is working as expected.
- Command:
df -h
Now, your logical volume will be mounted automatically and ready to use every time you reboot.
Resize a Logical Volume (LV)
One of the main benefits of LVM is the ability to easily resize logical volumes. Let’s extend our LV to 555GB.
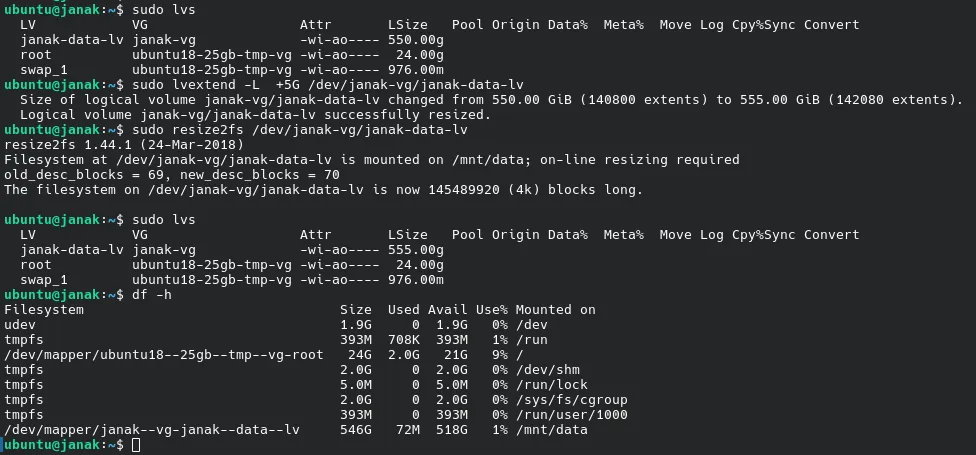
First, you need to extend the logical volume itself:
sudo lvextend -L +5G /dev/janak-vg/janak-data-lv- lvextend: This command extends the size of a logical volume.
- -L +2G: This flag specifies that you want to add 2 gigabytes to the existing size. You can also specify the final size directly (e.g.,
-L 7G).
Next, you must resize the file system on the logical volume to recognize the new space. For ext4, use resize2fs:
sudo resize2fs /dev/janak-vg/janak-data-lv- resize2fs: This command resizes ext2, ext3, or ext4 file systems. It will automatically detect the new size of the underlying logical volume.
Use df -h again to confirm the new size. The logical volume should now show as 7GB.
Remove the Logical Volume:
To remove a logical volume (LV), you must first unmount it if it’s currently in use. After unmounting, you can use the lvremove command to delete it.
Unmount the Logical Volume
First, determine if the logical volume is mounted. You can use the df -h command to see a list of mounted filesystems. Look for the logical volume you want to remove, which will likely be listed as /dev/VG_name/LV_name.
Once you’ve identified its mount point, use the umount command to unmount it.
sudo umount /mnt/dataRemove the Logical Volume
After confirming the logical volume is unmounted, you can safely remove it using lvremove. This action is permanent and will delete all data on the volume.
sudo lvremove /dev/janak-vg/janak-data-lvRemove the volume group:
To remove a volume group (VG), you must first remove all the logical volumes (LVs) residing within it. This is a critical safety measure to prevent data loss. Once the logical volumes are gone, you can remove the volume group itself.
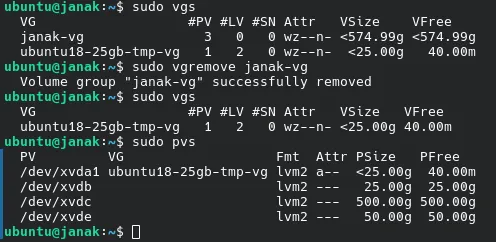
sudo vgremove janak-vgRemove the Physical Volume from the Volume Group
You’ll use the vgreduce command to remove /dev/xvdc from the janak-vg volume group. Since there are no logical volumes (LVs) or data on this physical volume, this command will execute without any issues.
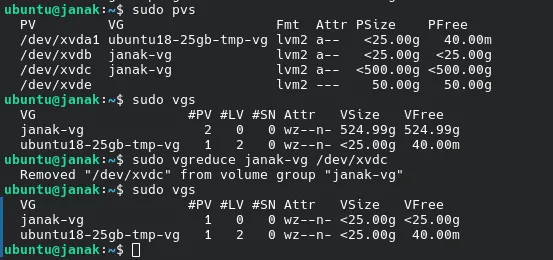
sudo vgreduce janak-vg /dev/xvdcRemove the physical volume:
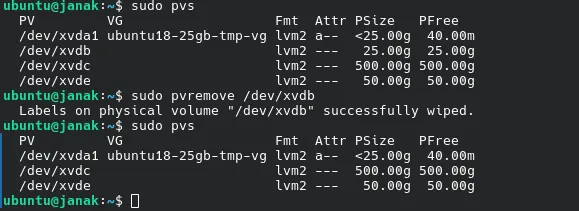
sudo pvremove /dev/xvdbYour /dev/xvdb disk is now back to its initial state.