How To Install and Configure Ansible on Ubuntu.
Install and configure Ansible on Ubuntu, set up communication with virtual machines (VMs) as managed nodes, and execute your first automation playbooks.
What is Ansible?
Ansible is an open-source automation engine that automates provisioning, configuration management, application deployment, intra-service orchestration, and much more. It’s popular because it’s:
- Agentless: No software needs to be installed on the managed nodes (the machines you want to control).
- Simple: Uses YAML for playbooks, which is human-readable.
- Powerful: Can automate complex multi-tier application deployments.
Step 1: Install Ansible on Ubuntu
You’ll install Ansible on your “control node” – this is the machine you’ll use to run Ansible commands and playbooks.
Install Ansible:
1
2
sudo apt update
sudo apt install ansible -y
Step 2: Configure SSH for Agentless Communication
Step 3: Configure the Ansible Inventory File
The inventory file (usually /etc/ansible/hosts or a custom file) tells Ansible which servers it can manage.
Open the default inventory file for editing:
1
sudo nano /etc/ansible/hosts #if dir not exit, create it
Add your managed nodes: You can organize your servers into groups. This is incredibly useful for targeting specific sets of servers with your playbooks.
Example
hostsfile:1 2 3 4 5 6 7
# This is the default ansible 'hosts' file. # # It should be in an INI format. Lines beginning with '#' are comments. # --- Start Local VM Configuration --- [local_vms] 192.168.253.100 ansible_user=janak # Replace 'janak' with your VM's username
Explanation for VM entry:
[local_vms]: A new group for your local VMs.192.168.253.100: The IP address of your VM.ansible_user=janak: Specifies the SSH username to connect with on this VM. Changejanakto the actual username you use on your VM.
If using password authentication (not recommended for general use): You would add
ansible_password=<your_vm_password>to the line, but storing passwords directly in inventory is insecure. Instead, use--ask-passor Ansible Vault.
Step 4: Test Ansible Connectivity (Ad-Hoc Commands)
Before running playbooks, it’s good practice to ensure Ansible can communicate with your nodes using ad-hoc commands.
Ping all hosts:
1
ansible all -m pingall: Targets all hosts defined in your inventory.-m ping: Uses the built-inpingmodule to test connectivity.
Run a command on a specific group (e.g., local_vms):
1
ansible local_vms -a "uptime"
local_vms: Targets only the hosts in thelocal_vmsgroup.-a "uptime": Executes theuptimecommand on the remote hosts.
You’ll see the uptime output for each web server.
Step 5: Create Your First Playbook
Playbooks are YAML files that define a set of tasks to be executed on your managed nodes.
Create a new file for your playbook:
1
nano first_playbook.yml
Add the following content to the file: This playbook will:
- Ensure the
nginxweb server is installed. - Ensure the
ufwfirewall is installed. - Start and enable
nginxandufwservices. - Allow HTTP traffic through
ufw. - Create a simple
index.htmlfile in the web root.
1
2
3
4
5
6
7
8
9
10
11
12
13
14
15
16
17
18
19
20
21
22
23
24
25
26
27
28
29
30
31
32
33
34
35
36
37
38
39
40
41
42
43
44
---
- name: Configure Webserver
  hosts: webservers # This playbook will run on hosts in the 'webservers' group
  become: yes       # This allows tasks to be run with sudo privileges

  tasks:
    - name: Ensure Nginx is installed
      ansible.builtin.apt:
        name: nginx
        state: present
        update_cache: yes

    - name: Ensure UFW (Uncomplicated Firewall) is installed
      ansible.builtin.apt:
        name: ufw
        state: present

    - name: Start and enable Nginx service
      ansible.builtin.service:
        name: nginx
        state: started
        enabled: yes

    - name: Start and enable UFW service
      ansible.builtin.service:
        name: ufw
        state: started
        enabled: yes

    - name: Allow HTTP traffic through UFW
      community.general.ufw:
        rule: allow
        port: '80'
        proto: tcp
        state: enabled
      when: ansible_os_family == "Ubuntu" # This task only runs on Ubuntu-based systems

    - name: Create a simple index.html file
      ansible.builtin.copy:
        content: "<h1>Hello from Ansible!</h1>"
        dest: /var/www/html/index.html
        owner: www-data
        group: www-data
        mode: '0644'
Explanation of the Playbook:
---: Indicates the start of a YAML file.- name: Configure Webserver: A descriptive name for the playbook.hosts: webservers: Specifies that this playbook will run on the hosts in thewebserversgroup from your inventory.become: yes: This is crucial! It tells Ansible to usesudo(become root) for the tasks that require elevated privileges (like installing packages, starting services, and writing to/var/www/html).tasks:: A list of tasks to be executed.- name: ...: A descriptive name for each task.ansible.builtin.apt:: This is a module. Ansible has thousands of modules for various tasks. Theaptmodule is used for managing packages on Ubuntu/Ubuntu systems.name: nginx: The name of the package to manage.state: present: Ensures the package is installed.update_cache: yes: Updates theaptpackage cache before installing.
ansible.builtin.service:: Manages system services.name: nginx: The service name.state: started: Ensures the service is running.enabled: yes: Ensures the service starts automatically on boot.
community.general.ufw:: Manages UFW firewall rules.when: ansible_os_family == "Ubuntu": This is a conditional statement. The UFW task will only run if the operating system family of the managed node is Ubuntu (which Ubuntu is). This makes your playbooks more robust.
ansible.builtin.copy:: Copies files from the control node to the managed node, or creates files with specified content.content: "<h1>Hello from Ansible!</h1>": The content to put in the file.dest: /var/www/html/index.html: The destination path on the remote server.owner: www-data,group: www-data,mode: '0644': Sets file ownership and permissions.
- Ensure the
Save and exit nano.
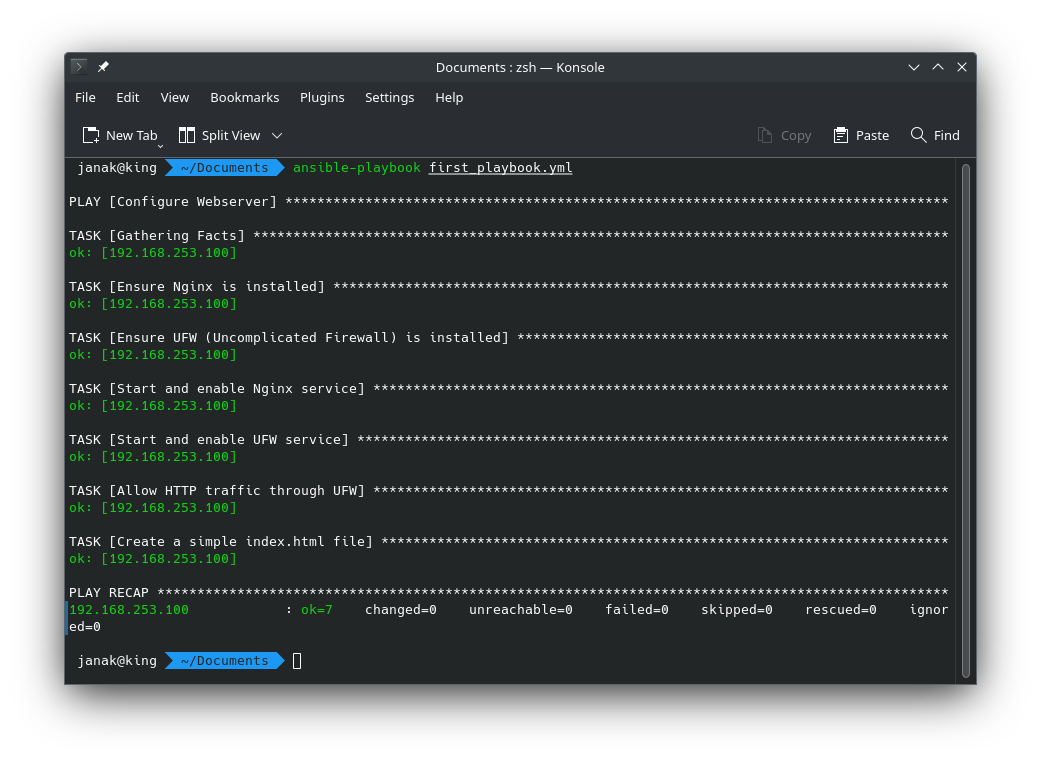
Step 6: Run Your Playbook
Now, let’s execute your first Ansible playbook!
Run the playbook:
1
ansible-playbook first_playbook.yml # -K for vm's authentication
You’ll see output that shows each task being executed.
Verify the changes:
To confirm the playbook’s effects, you can now check your VM:
Open a web browser and navigate to
http://192.168.253.100. You should see the “Hello from Ansible!” message.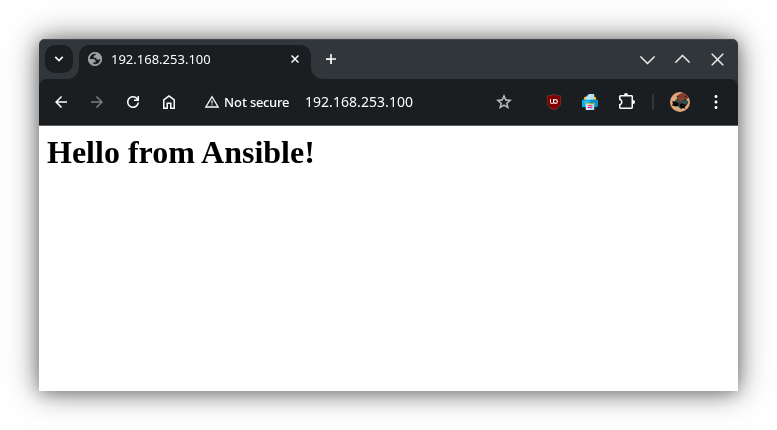
- SSH into your VM (
ssh [email protected]) and verify: - Nginx status:
sudo systemctl status nginx(It should be active/running). - UFW status:
sudo ufw status(It should show port 80 allowed). - Index file content:
cat /var/www/html/index.html(It should display “Hello from Ansible!”).
- SSH into your VM (
Next Steps and Important Concepts
Refrence DigitalOcean How to Use Ansible: A Reference Guide
- Idempotence: Ansible is designed to be idempotent. This means you can run the same playbook multiple times, and it will only make changes if the system is not in the desired state. If Nginx is already installed and running, Ansible won’t try to install or start it again, resulting in
okstatus for those tasks. - Modules: Explore more Ansible modules! There are modules for managing users, services, packages, files, databases, cloud resources, and much more. You can find them in the Ansible documentation.
- Variables: Variables allow you to make your playbooks more flexible. Instead of hardcoding values, you can define them as variables.
- Roles: For larger, more complex projects, organize your playbooks into roles. Roles provide a standardized directory structure for tasks, handlers, templates, and variables.
- Conditionals (
when): As seen with the UFW example,whenstatements allow you to run tasks only if certain conditions are met. - Handlers: Handlers are tasks that are triggered by other tasks. For example, if you change a configuration file, you might want to restart a service. You’d notify a handler to restart the service.
- Vault: For sensitive data (passwords, API keys), use Ansible Vault to encrypt your variables and files.
- Ansible Galaxy: A hub for sharing and finding Ansible roles.