First Database Project - Setting Up & Managing MySQL/MariaDB on Linux, Database Dump, Backup and Restore
Dive into this practical assignment to learn how to install and secure MariaDB on your Debian Linux system. Covering database creation, user management, remote connectivity, and essential dump, backup/restore operations.
The Assignment Tasks:
- Database Server Installation:
- Install the MySQL-compatible database server (MariaDB Server) on your Linux machine.
- Secure your MariaDB installation using the provided script.
- Database Creation:
- Create a new database named
broadway.
- Create a new database named
- User Management & Privileges:
- Create a new database user named
devopswith the password123devops. - Grant this
devopsuser all necessary privileges to access databases from any host (%) or a specific remote IP address (if applicable).
- Create a new database user named
- Table Creation & Data Insertion:
- Within the
broadwaydatabase, create a sample table (e.g.,movies,artists,shows). - Insert several sample data records into your newly created table.
- Within the
- External Client Connectivity:
- Identify the default running port for your MariaDB server (e.g., 3306).
- Configure your server’s firewall (e.g., UFW) to allow incoming connections on this database port.
- From a separate “physical host” machine (or your local machine if the server is a VM), use
telnetto verify that the database port is reachable. - Install a graphical database client (e.g., DBeaver, a popular open-source tool, as “db-reaver” is not a standard client) on your physical host.
- Establish a connection to your
broadwaydatabase using thedevopsuser from this client. - Confirm you can view the newly created table and the inserted data through the client.
- Database Backup and Restore:
- Perform a database dump (backup) of the
broadwaydatabase, saving it to a file with a unique name. - Create a new, empty database (e.g.,
broadway_restored). - Restore the data from your backup file into this new database.
- Verify that the
broadway_restoreddatabase now contains your table and data.
- Perform a database dump (backup) of the
Part 1: Setting up the MySQL/MariaDB Server
1. Install MariaDB Server (as mysql-server alternative)
- Update package lists:
1
sudo apt update - Install MariaDB Server:
1
  sudo apt install mariadb-server
During installation, you might be prompted to set a root password for MariaDB. If not, it will be set in the next security step.
- Check status:
1
  sudo systemctl status mariadb
(It should be
active (running). Pressqto exit.)
2. Secure MariaDB Installation
This script enhances security by setting passwords, removing anonymous users, etc.
1
sudo mysql_secure_installation
- For
Enter current password for root:: If you weren’t prompted for a password during install, just press Enter. Set root password? [Y/n]: TypeYand set a strong password. Remember this password!- Follow the prompts, generally answering
Yfor recommended options (remove anonymous users, disallow remote root login, remove test database, reload privilege tables).
3. Create a database broadway
- Log in to MariaDB shell as root:
1
  sudo mysql
(This logs you in as the database
rootuser because your Linux user hassudoprivileges and is connecting locally.) - Create the database:
1
  CREATE DATABASE broadway;
(Don’t forget the semicolon
;at the end of SQL commands). - Verify creation:
1
  SHOW DATABASES;
You should see
broadwayin the list.
4. Create a user devops with password 123devops and Grant all privileges
Important Security Note: Using simple passwords like 123devops and granting ALL PRIVILEGES ON *.* (on all databases) is generally highly discouraged in production environments. This is purely for this assignment.
- Create the user and grant privileges (inside the MariaDB shell):
1
2
3
  CREATE USER 'devops'@'%' IDENTIFIED BY '123devops';
  GRANT ALL PRIVILEGES ON *.* TO 'devops'@'%';
  FLUSH PRIVILEGES;
'devops': The username.'%': This means the userdevopscan connect from any host (including your “physical host”). If you wanted to restrict it to a specific IP (e.g., your physical host’s IP192.168.1.100), you’d use'devops'@'192.168.1.100'. Using%is often necessary for assignments if your “physical host” IP might change or isn’t fixed.'123devops': The password.ALL PRIVILEGES ON *.*: Grants all permissions on all databases (*.*) to this user.FLUSH PRIVILEGES;: Reloads the grant tables to apply the changes immediately.
- Exit the MariaDB shell:
1
  exit
5. Create a table on the database broadway
- Log back in as
devopsuser (this time using the password):1
mysql -u devops -p
Enter
123devopswhen prompted for the password. - Switch to the
broadwaydatabase:1
USE broadway;
- Create a sample table (e.g.,
movies):1 2 3 4 5 6
CREATE TABLE movies ( id INT AUTO_INCREMENT PRIMARY KEY, title VARCHAR(255) NOT NULL, director VARCHAR(255), release_year INT );
- Verify table creation:
1 2
SHOW TABLES; DESCRIBE movies;
- Exit the MariaDB shell:
1
exit
Part 2: Connecting from your “Physical Host”
Assumption for this part: Your “Linux machine” (where the MariaDB server is installed) is a VM, and your “physical host” is the machine you’re running your terminal from, which is separate from the VM. If your database server is directly on your physical machine, then “physical host” just refers to that same machine.
6. Find the database running port and ensure network reachability
- Find MariaDB’s Port: MariaDB/MySQL’s default port is
3306. You can confirm this by checking its configuration file.1
grep -E "port|bind-address" /etc/mysql/mariadb.conf.d/50-server.cnf
You should see
port = 3306. You might also seebind-address = 127.0.0.1. If it’s127.0.0.1, it means MySQL is only listening on the local machine. To allow external connections, you would need to change this to0.0.0.0(listen on all interfaces) or your VM’s specific IP address. However, since we granteddevops@'%', the server should already be listening on interfaces for remote connections unless it’s explicitly set to localhost only. Let’s assume it’s default for now. - Firewall on your Linux Machine (VM): You must open port
3306on your Linux machine’s firewall (UFW) to allow incoming connections.1 2 3
sudo ufw allow 3306/tcp sudo ufw reload sudo ufw status verbose # To verify the new rule
- VM Network Configuration (if your database is on a VM): This is crucial for “physical host” connectivity.
- Option A: Bridged Networking (Recommended for easy access on same LAN) If your VM’s network adapter is set to Bridged, it gets its own IP address on your local network (e.g.,
192.168.1.105). You can connect to this IP directly from your physical host. <!– * Option B: NAT with Port Forwarding (If Bridged isn’t an option) If your VM uses NAT, you need to set up port forwarding in your virtualization software (VirtualBox, VMware).- Host Port: Pick an unused port on your physical host (e.g.,
33060). - Guest IP: Your VM’s internal IP (e.g.,
10.0.2.15). - Guest Port:
3306. Then, your physical host will connect to its own IP on theHost Portyou defined. –>
- Host Port: Pick an unused port on your physical host (e.g.,
- Option A: Bridged Networking (Recommended for easy access on same LAN) If your VM’s network adapter is set to Bridged, it gets its own IP address on your local network (e.g.,
- Find your Linux Machine’s IP Address (VM or Physical): On the Linux machine where MariaDB is running:
1
ip a
Look for the
inetaddress of your network interface (e.g.,eth0,enp0s3,ens33). This is theDB_SERVER_IPyou’ll use fortelnetand client connection. - Do
telnetfrom your Physical Host:- First, install
telneton your physical host if it’s not already there.- On Debian/Ubuntu:
sudo apt install telnet - On Windows: Enable “Telnet Client” in “Turn Windows features on or off”.
- On Debian/Ubuntu:
- Now, from your physical host’s terminal, try to connect to your
DB_SERVER_IPon port3306.1
telnet DB_SERVER_IP 3306
- Success: If you see a blank screen or a garbage character (like
~), it means the connection was established. PressCtrl + ], then typequitand pressEnter.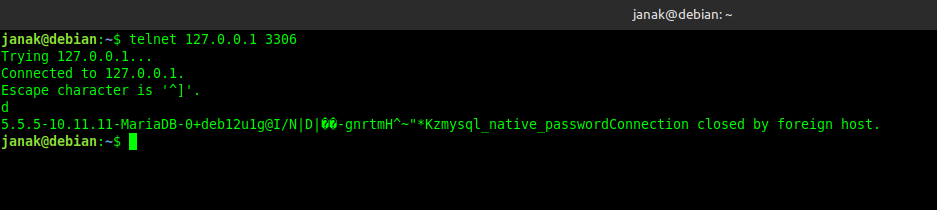
- Failure: If it says “Connection refused,” “No route to host,” or hangs, it means the port isn’t reachable. Recheck your VM’s firewall (
ufw), MariaDB’sbind-addressin50-server.cnf, and your VM’s network settings (Bridged/NAT + Port Forwarding).
- Success: If you see a blank screen or a garbage character (like
- First, install
7. Install db-client (assuming DBeaver)
Since db-reaver isn’t a known client, I’m assuming you meant DBeaver, which is a very popular open-source GUI database client.
- Install DBeaver on your Physical Host:
- If your Physical Host is Linux (e.g., Ubuntu/Debian):
- Download the
.debpackage from the DBeaver website. Choose “Community Edition”. - Install it using
dpkg:1 2
sudo dpkg -i dbeaver-ce_*.deb sudo apt install -f # To fix any missing dependencies
- Search for “DBeaver” in your applications menu to launch it.
- Download the
- If your Physical Host is Windows/macOS: Download the appropriate installer from the DBeaver website and follow the installation wizard.
- If your Physical Host is Linux (e.g., Ubuntu/Debian):
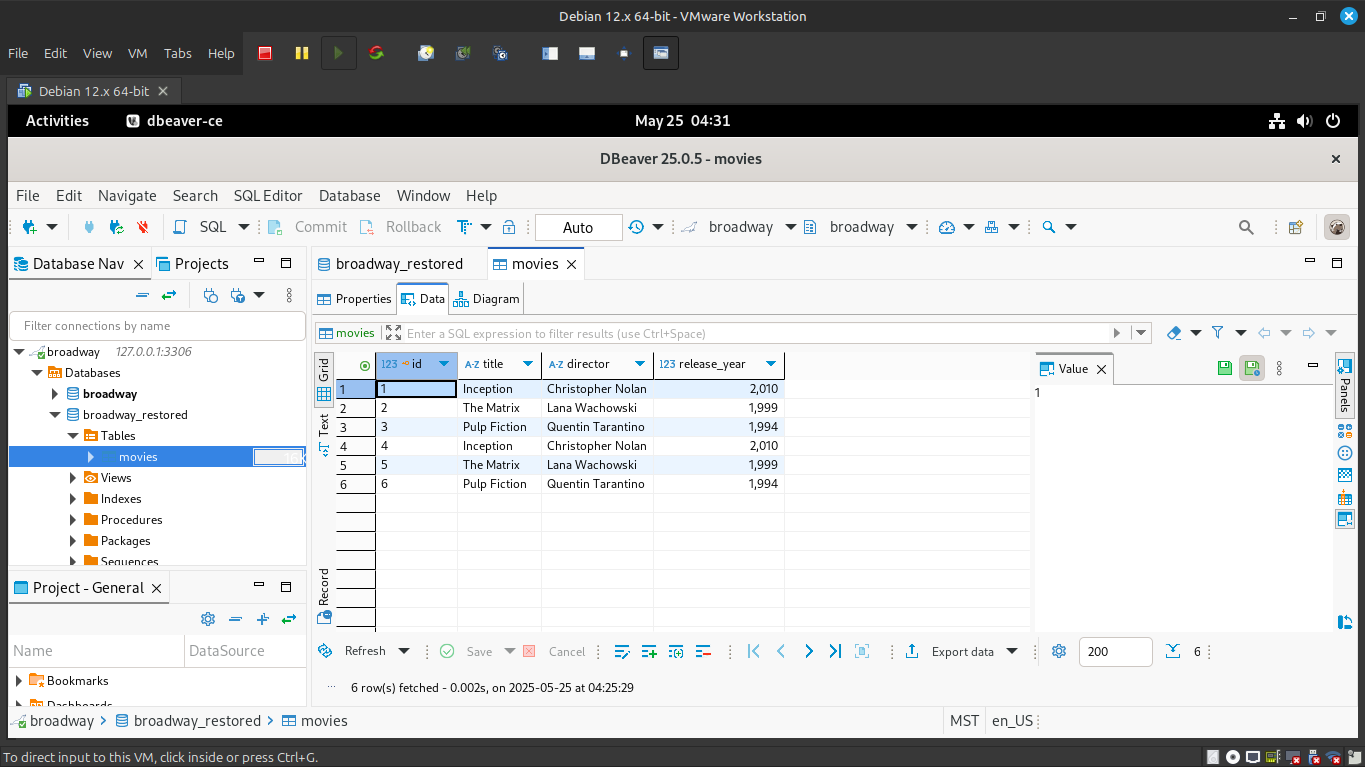
8. Connect to the database using DBeaver (or your chosen client)
- Launch DBeaver.
- Click on Database -> New Database Connection.
- Select MySQL (or MariaDB if it’s an option). Click Next.
- Settings:
- Host: Enter the
DB_SERVER_IPyou found earlier (your Linux machine’s IP, or your host’s IP if using NAT port forwarding). - Port:
3306(or theHost Portif you used NAT port forwarding). - Database:
broadway - Username:
devops - Password:
123devops
- Host: Enter the
- Click Test Connection… to verify. If it works, click Finish.
- You should now see the
broadwaydatabase and its tables in the DBeaver Navigator.
9. See if you can see the table
- In DBeaver (or your client), navigate through the connection to
broadwaydatabase. - Expand the “Tables” node. You should see your
moviestable listed. - Right-click on
moviestable -> “View Data” or “Script Table -> SELECT statement” to see its structure.
10. Insert some data into the table
- In DBeaver, you can often right-click the
moviestable and choose “New Row” to insert data via a GUI. - Alternatively, open an SQL editor in DBeaver (SQL Editor -> New SQL Script) and execute:
1 2 3 4
INSERT INTO movies (title, director, release_year) VALUES ('Inception', 'Christopher Nolan', 2010), ('The Matrix', 'Lana Wachowski', 1999), ('Pulp Fiction', 'Quentin Tarantino', 1994);
- Run a
SELECTquery to confirm data:1
SELECT * FROM movies;
Part 3: Database Dump and Restore
11. Dump the database with a unique file name
This command should be run from your Linux machine (VM) terminal.
1
mysqldump -u devops -p broadway > broadway_dump_$(date +%Y%m%d_%H%M%S).sql
mysqldump: The utility to dump MySQL/MariaDB databases.-u devops: Connects as thedevopsuser.-p: Prompts for the password (123devops).broadway: The name of the database to dump.>: Redirects the output to a file.broadway_dump_$(date +%Y%m%d_%H%M%S).sql: Creates a unique filename using the current date and time (e.g.,broadway_dump_20250525_143000.sql).
12. Create a new database and restore the dump to the new database
- Create a new database (inside MariaDB shell):
1
  mysql -u devops -p
(Enter
123devopspassword)1 2 3
CREATE DATABASE broadway_restored; SHOW DATABASES; exit
- Restore the dump to the new database (from your Linux machine’s terminal):
1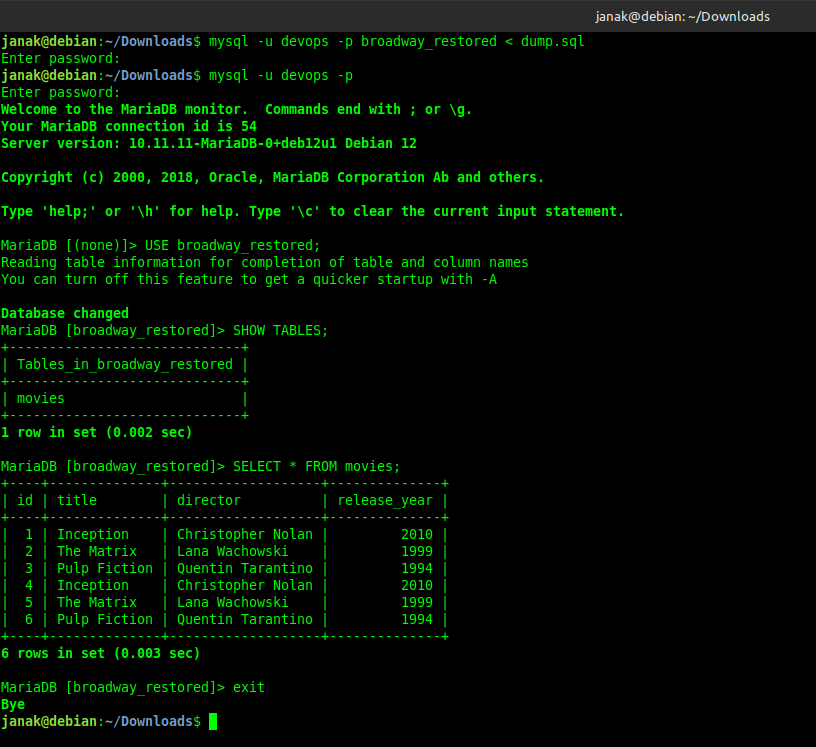
mysql -u devops -p broadway_restored < broadway_dump_$(date +%Y%m%d_%H%M%S).sql
- Replace
broadway_dump_$(date +%Y%m%d_%H%M%S).sqlwith the actual filename of your dump (you can uselsto find it). -u devops: Connects asdevops.-p: Prompts for the password.broadway_restored: The name of the new database to restore into.<: Redirects the input from the SQL dump file.
- Replace
- Verify the restore (inside MariaDB shell):
1
  mysql -u devops -p
(Enter
123devopspassword)1 2 3 4
USE broadway_restored; SHOW TABLES; SELECT * FROM movies; exit
You should see the
moviestable and the data you inserted!